Welcome to 3D Thursday!
Some people may remember a little while ago I was asking how other bloggers plan their posts, do they have a structure, do they schedule ahead and so on. Whilst reading the responses (and thanks again to everyone who took time to comment) I began to get a few ideas in my head, and one thing I realised was that I wasn’t posting anything much other than cards, yet I love making 3D objects too. Maybe this was worth pursuing?
I decided I would try a regular 3D-something post each week and see how I go. Hopefully I will at least make it to week 3 anyway. The irony of failure to do this would not go unnoticed.
Not wishing to raise anyone’s expectations for the future, not everything will be quite on this scale, but on week one I thought I may as well go all in.
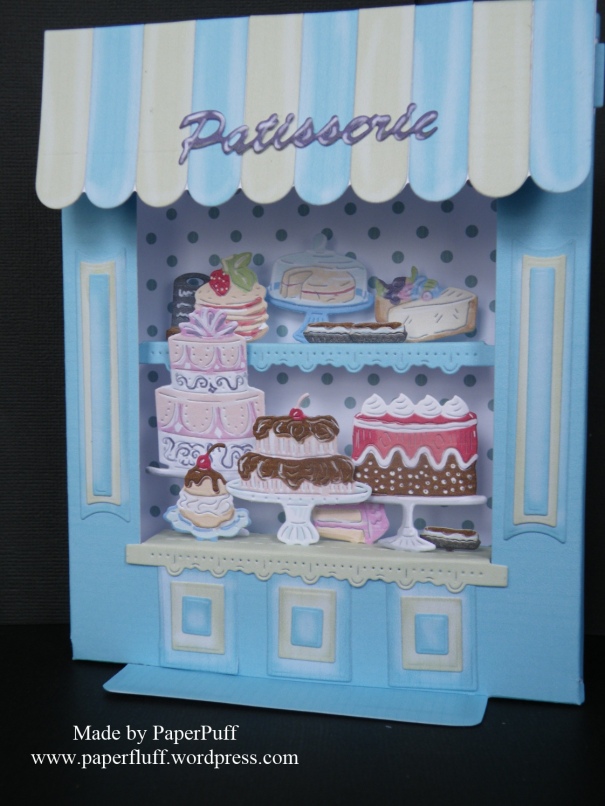
This is a Tattered Lace Retail Therapy shop. Cake shop, obviously! Well they say if you want to write about something, start with what you know…. And this will be something of a novel because I thought I would write a review, of a sort. Non-crafters, feel free to look at the pretty pictures only! Well, anyone can really….
This was my first attempt. I bought the bundle which gives you dies for the shop exterior, three different interiors and a CD-ROM with images to match the dies, backgrounds etc. There are absolutely tons of dies so lots of scope to change the look of your finished project every time, should you wish. The detail for the shop exterior is amazing – all sorts of different architectural features, hanging baskets etc to play with.
I started off by looking at the CD-ROM, which is a Click, Print, Go! product. This should mean you just open, browse through the selections and then print your choices. You do not want to resize the images as they are made to fit the dies. However, the running programme does not work with my Windows 7. I had contacted Tattered Lace about this in the past and to be honest I was a bit let down by their response. I felt that if they knew it was a problem then they should mention it, or fix it. Maybe I just got them on a bad day, but whilst waiting for them to get back to me I found my own solution. I copy into Serif CraftArtist, and although the image sheet comes in too small I just resize it to exactly A4 and it works fine. If you have had the same experience and have got CraftArtist then this may work for you too. I was hoping the issue might have been fixed by now, but I still have to go through the procedure with this new CD-ROM. It works, but it takes longer and means I have to wade through lots of file folders instead of whizzing through screen images. Because of this I didn’t go through everything on the disk, just found some colours I liked and made a start.
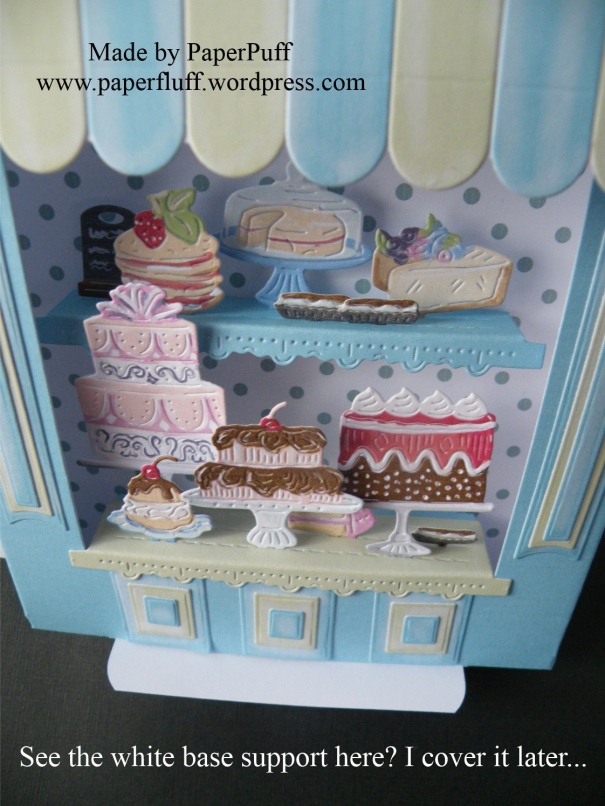
I chose a bright blue and soft green combination, and cut the shop shell first. Be aware that if you have colour on only one side of your card, because you will be folding two parts (the canopy and the support at the base) back on themselves, you will end up with white showing, as you can see on the base in this shot here.
For the canopy you are likely to be covering it with lovely scallop shapes anyway, and for the base I just covered it with some more of the blue. It’s not a problem, just don’t think you have done something wrong! Of course though you could use some card coloured on both sides. The construction is pretty obvious, and included on the packaging anyway.
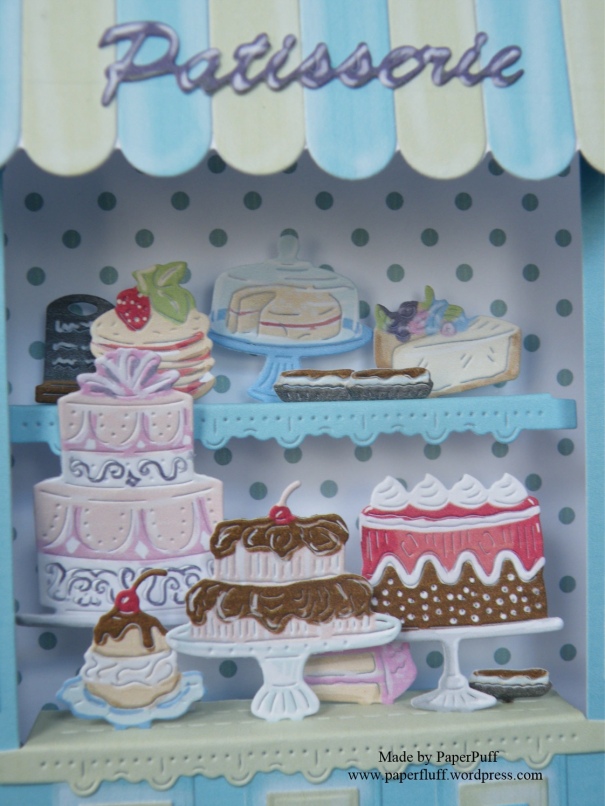
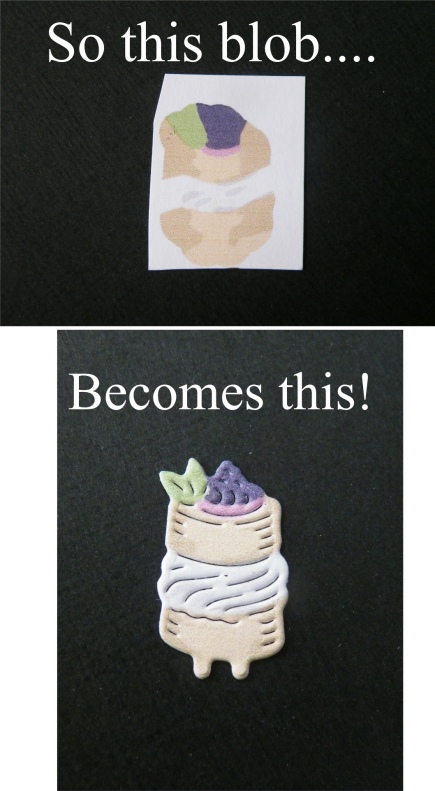
Now for the shop window! The images look weird when you print them, some almost unrecognisable. It’s a bit like a party game…hmmn…what might that be…but don’t worry, they are actually pretty genius. Helpfully all the dies are labelled, but I did have a few head scratching moments trying to match them to the printout. Once you have that sussed, just centre the die on the image and cut it out. It is amazing how an out of focus blob suddenly turns into a scrummy cake! I was majorly impressed with this. There may have been a dance…
You also have shelves, cake stands, a little menu board, a tea service, loads. All the images have a couple of little notches that slot into slits on the shelves to help them stand upright. Nice!
I thought it would be clever to attach the base at the right hand side only to a piece of card big enough to then fold in half at the left hand side once all the detail had been added in, thus making my base card. Like this…

When will I learn? NEVER try to be clever. The lovely stiff card I was using simply did not want to fold close enough to the card edge for my liking, giving me a semi-spotted small rim down the spine. So I chopped it off instead. Probably a much better idea to stick a very slightly smaller (by a couple of millimetres) card to the back afterwards, or just provide a pretty die cut shape (with double-sided tape to affix it) that the giver can write on.
There are some helpful instructions on the Tattered Lace website, in the Downloads section. I didn’t look at these until after I had finished of course. I should have checked them out as it has cleared up the mystery of the cake stand construction for me!
I haven’t had time to make a second one yet. They do take a while, but if you like construction projects it is, honestly, great fun, and the end result is pretty darn fab. I know plenty of people who would love to receive one of these, and the images won’t just be restricted to shop fronts either, as the die cuts can easily be used for other projects. Would I recommend the product? Absolutely, definitely, yes. Do I want all the other shops they are teasing with? Absolutely, definitely, yes! Will I leave you with one more picture? Why not!
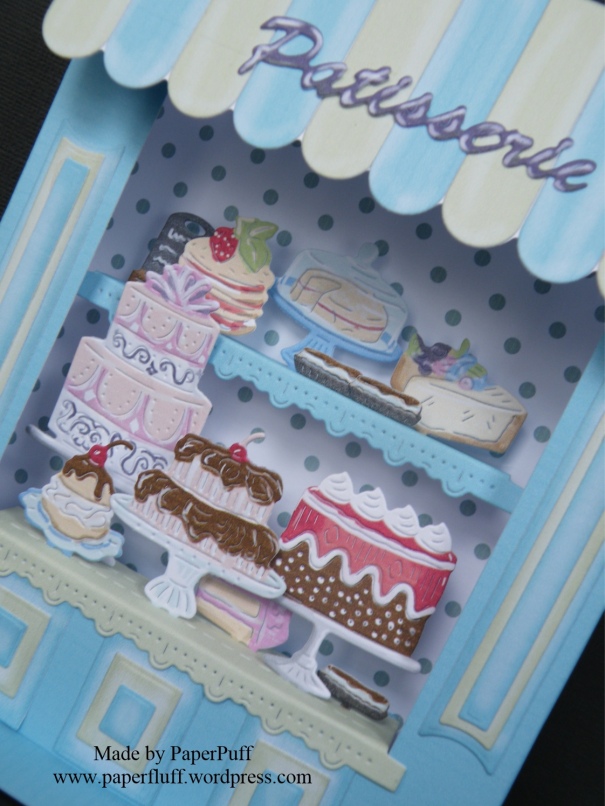
Supplies: Tattered Lace Retail Therapy Store and Retail Therapy Patisserie dies and CD-ROM; strong white card, glue and red liner tape

Wow, that is amazing, so cute and it looks like a lot of fun to make!
LikeLiked by 1 person
thanks Laura! It was great fun for sure. Can’t wait to try some more!
LikeLike
This is amazeballs Gill! And this is your first attempt? – amazing!!! There is so much detail it really is a work of art and anyone would absolutely treasure this if they were the lucky recipient! Can’t wait for the next one 🙂
LikeLiked by 1 person
Thanks Karen – it really is the dies, not me. They work in a way I have never seen before. I am itching to start number two though!
LikeLike
So intricate and such a pretty, professional result! Good for you figuring it all out.
LikeLiked by 1 person
Thanks! Who knows, this might be beginner’s luck and the next one might be a disaster!
LikeLiked by 1 person
Hmm, I’m doubtful on both accounts… Your work is always beautiful. 🙂
LikeLiked by 1 person
You are very kind!
LikeLiked by 1 person
Holy Guacamole, that is so intricate! I cannot say I have ever seen a kit like this. You did a wonderful job, Gillian!
LikeLiked by 1 person
Thanks! They are new to the market I think. Honestly it is not too fiddly at all. Just fun!
LikeLiked by 1 person
Very cute! I like your new “3D Thursday” feature. I don’t find I make many 3D projects (nowhere to put them!).
LikeLiked by 1 person
That is the very same problem I have. A flat card vs something the size of a box of chocolates… I am just telling myself I will have to be good about selling or giving them to friends and family. We’ll see. I just fancied having some kind of (minimal) plan for the week really!
LikeLiked by 1 person
It was an adorable project!
LikeLiked by 1 person
OMGoodness how extraordinary, I love it to bits x
LikeLiked by 1 person
Thanks so much! I fell in love with them so had to make a purchase!
LikeLiked by 1 person
I’m not surprised x
LikeLiked by 1 person
OH.MY.WORD.
Pass me my doffing cap please…that is amazing! Lovely, intricate and a wonderful gift for anyone, any occasion…:)
LikeLiked by 1 person
Aw, I’m pleased you like it. If I was making one for you I would put the teapot and cups and teabags in too!
LikeLiked by 1 person
Lol…thank you 🙂 x!
LikeLiked by 1 person
It looks so cute! And now I really want cake 😀
LikeLiked by 1 person
Thanks! That was one of the downsides for me, I have to say. Something with a cherry on top…
LikeLiked by 1 person
That’s so sweet! (I couldn’t resist the pun, or the cake I’m about to eat for lunch.) 😀
LikeLiked by 1 person
Lol! Enjoy the cake!
LikeLike
That is one special card! I love the 3-D effect! Wonderful job 🙂
LikeLiked by 1 person
Thank you! Made me want to eat cake though!
LikeLiked by 1 person
Thank goodness it wasn’t scented 🙂
LikeLiked by 1 person
Let them eat cake! This is wonderful. Beautifully made. I was amazed at how the “blob” turned out.
Flo x
LikeLiked by 1 person
Thanks! And yep, the transformation of the blob is pretty spectacular! but it put the ‘Ugly Duckling’ song into my head and it will not go away!
LikeLike
That is really cool! I have never done a 3 D card before. I love it.
LikeLiked by 1 person
Thank you. It was very easy, once you have the tools!
LikeLiked by 1 person
That’s adorable! I love how the dies work magic on the printout blobs too. Will look forward to more 3D extravaganzas. Please tell me there’s a Christmas one coming up?
LikeLiked by 1 person
I hopes so, if not I may have to try and work something out myself with small images…
LikeLike
You have patience that I will never have. That card is beautiful with a million little pieces. I am truly in awe.
LikeLiked by 1 person
Not a million – just under 50!
LikeLike
Ohhh, I saw these dies demonstrated on Create and Craft … last week I think, and again yesterday! The lady yesterday made the flower shop. I was STUNNED at how easy they were, and how quickly they go together! The shop itself was made from just ONE DIE! That bit I couldn’t get my head around so watched really carefully to see how this worked. I was convinced that this had to be a bit of poetic licence and it was half a dozen different pieces – but yes indeed, she folded where it had to be folded, inserted that bit at the bottom as a kind of ‘foot’ which stopped the card falling over … and VOILA! The shop itself was made.
I think the only part which looked like a bit of a fiddle, was inserting those tiny tabs of things in the ‘window display’ (the cakes, the handbags, the flowers etc etc), through the ‘shelf’ they were standing on, so that they stood up properly. The tabs are really small, and the little slots on the shelf have to be small in order to make sure that they ‘grab’ the cut outs and keep them there. I think I’d fail with that one. Patience isn’t somethng I have in abundance. lol
I was convinced that I NEEEDED to buy these dies – but at a hundred pounds for the set, I sadly had to tell myself I couldn’t afford them. 😦
I love the colours of the shop you’ve made. And it looks so sweet and so very different from any card you’d be able to buy in a store. I think you’ll be able to sell quite a lot of these to work colleagues, friends and followers, because they stand out from other regular cards they could or would normally buy! Do you have an Etsy shop? If not, you really ought to set yourself up with one. Seriously Puff. I think you could do well selling these. If you already have an Etsy store, you need to put a link in your side bar so that we can all come and buy from you! You’ll earn money from your crafting, to pay for more crafty goodies! YAY!
This particular ‘cake’ shop would be perfect for Birthdays – the cakes would be the ‘Happy Birthday’ sentiment. But … you could give one of these at any time really … cheer someone up; get well soon; anniversary; … maybe not to someone who’s dieted and finally reached their goal weight though. LOL
It looks like a really fun to make card, and a fabulously fun to receive too! All in all – I’d call this a GREAT make, Puff!
Squidges ~ Cobs. x
LikeLiked by 1 person
Nope, no Etsy store. I know these were a ‘considered purchase’ as they say, but I just knew I would love making them. Also, I am hoping to sell some of my stuff at some point, and these are quite eye-catching and different. Basically I just couldn’t resist and am now trying to justify it to myself!!!
LikeLiked by 1 person
Aw no… you did the right thing. I just knew that Mr. Cobs would have a fit if I spent that much on Tattered Lace dies…. especially so because (ok this is a secret so you have tokeep it between you and me, and your hundreds of followers, ok?) ok .. here we go… [whispering really quietly] … especially so b.e.c.a.u.s.e…..
I have spent over a hundred pounds on Graphic 45 stuff last week. eeeeeeeek!
DON’T TELL!
I wanted the dies … but I couldn’t justify spending another hundred on crafts – particularly when I want some special blinds for the conservatory, and some of those posh white wooden blinds that are *like* venetian blinds (but wood), but you can move the slats AND open the blinds like you’d open doors.
Mr. C is just about coming round to the idea of these … so I thought I’d better not push me luck! lol.
But thrilled you have them. And … I’ve just had another thought … you could die cut some of these and put ‘one whole kit’ for sale on ebay, so that a buyer could buy a kit to make up themselves, without having to spend the big money on a whole kit. That would also make the dies kind of pay for themselves!
(just a thought).
oh p.s. You NEED an ETSY shop. I swear to dog that you’d sell so many handmade cards on there.
squidges ~ Cobs.x
LikeLike
Congrats – I would not have patience to do this. It looks stunning 🙂
LikeLiked by 1 person
Thanks – honestly really not tricky, just a lot of little bits to die cut is all.
LikeLiked by 1 person
Looks fab 🙂
LikeLiked by 1 person
I absolutely love this!!! I have a friend visiting me from Australia. She owns a bakery. I showed this to her….she fell in love with it too!!! Can I repost this?
LikeLiked by 1 person
Sure! Glad you like it enough to do that!
LikeLike
I absolutely loved this, very much up my street, so to say! (I know you like puns) 🙂 I didn’t even know this dye existed, now I have to go look, and you know what happens when we do these silly things – your fault! Brilliant though x
LikeLiked by 1 person
Thank you! They are a great product. Apparently more shop interiors will be coming too, but I don’t know what. Christmas would be fab but probably a bit late for them to do that now.
LikeLiked by 1 person
Ooh, I’ve been gone for 10 days and look what I’ve missed! This is very cool! I love how the little color-printed blobs die-cut into those fancy cakes.
LikeLiked by 1 person
It is so clever, isn’t it? Lovely toy to play with, I have to say!
LikeLiked by 1 person
Oh my goodness, this is adorable! I’ve never seen these before. This looks very interesting! But, I don’t even have enough time to make cards so I better not check these out and just be satisfied with reading your posts! So are you adding a card to the back of this to make the store front the “front” of the card, or are you trying to fold the back to cover the front so the store in inside the card? Just curious. Lovely project! I’m jealous! 🙂
LikeLiked by 1 person
Curiosity is a good thing! The store has to be the front of the card as it is about a bit under an inch deep. However if you get really creative you can make a shop ‘interior’ too. So the store would be the front of the card, then as you open it you reveal the interior, with extra shelves and so on. I am probably explaining this really badly – sorry!
LikeLiked by 1 person
I love to read all these replies. I used Inkscape. I copied the file from the CD to My Pictures and then under file in Inkscape I opened it. It appears after a few seconds. Then I clicked on the image and moved the arrows to size it. Measurements are at the top. You need to change it to inches. I made it a scoshe longer and experimented with the length until I got it to cut right with the die. Only wasted a few sheets doing this. NOW I’m happy! Could not have done it if I hadn’t seen this post. Thanks so much!! I will be following you from now on!
LikeLiked by 1 person
Glad to have been of help! I haven’t heard of Inkscape, but maybe your comment will help others in the same situation. Nice to see you here!
LikeLike
Amazing!!!!!
LikeLiked by 1 person
Thanks!!
LikeLiked by 1 person
That looks so fun to make, and really effective. Well done x
LikeLiked by 1 person
It was great fun, but it made me want cake…..
LikeLike
Thank you SO much for sharing your experiences with the Retail Shop. I have just ordered a mine and anxiously awaiting them. Your information will surely help. Thanks again. (steponitstamper:Splitcoaststamper) Laurie
LikeLiked by 1 person
Hi! I’m sure you will love them. The finished results are really good and I can’t wait to make more. you have any problem and think I might be able to help (unlikely, but you never know!!) then just drop in a comment somewhere and if I can, I will. I just popped over to your gallery to take a look (I am really nosey and love to see what everyone else is making!). Great cards! Nice to meet you!
LikeLike
Great review I think the graphics should be free from their website after all the dies are not cheap and you can’t really do anything else with the graphics other than use their dies but it’s a common thing for these companies to try and bleed you dry there is always a few separate dies and what not you have to purchase to get the job done, Crafters Companion are the worst for this.
LikeLike
Sorry for not replying sooner but I have had some ongoing technical issues. Thank you so much for commenting. I agree that making the print files available to download would be a great idea because, as you say, they are quite specific to the product. Maybe it would be worth suggesting it to them? thanks again for visiting!
LikeLike