This is the ‘series’ I was mentioning in my post on coincidences the other day. It might only be a one-off, but hopefully will be an occasional themed post, if I can come up with enough projects. Who knows? Maybe the universe does, but certainly not me!
Basically the idea is to make a card from scratch in about 10 – 15 minutes. And in real person time, not ‘I had everything out, cut, matted, and all my stamps layered onto different mounts ready to go’ time as they do on craft telly. More like a smash and grab raid on your stash. So obviously nothing too complicated. But I am a fan of ‘clean and simple’ anyway, so this should be fun, right?
Of course a lot of you will know all this, but for those who have not yet tried card making or are relatively new to the party, this is a ‘how to’ post, with pictures, to produce a simple, simple card.
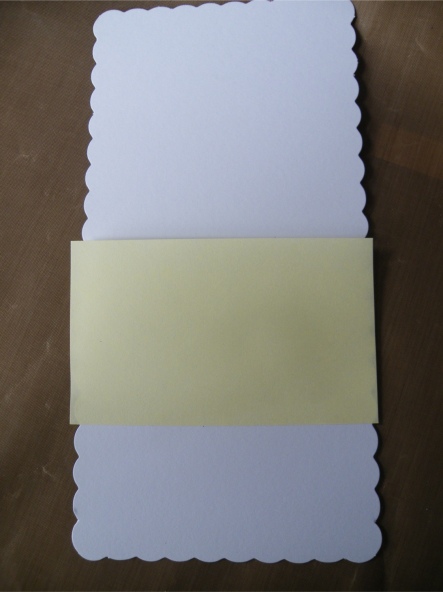
One of the easiest ways to create impact quickly is with a masked stamped area and a clean stamped sentiment. So, you lay a bit of masking tape (you can use any low tack tape, or post-it notes) over a section of the card, but it is very important to make sure it is straight – anything off true will show up big time. Well, for me it does, anyway. To ensure the making of it was super-speedy I used a card blank with scalloped edges. This means I can bypass any measuring and just run the post-it note from scallop to scallop. Easy peasy!
Now you want to cover that section with one or more (depending on size) stamped images to fill the space; make sure you stamp over the masked line, as much as possible, because this is what will give you a nice defined look when the tape is removed, and give you a good effect.
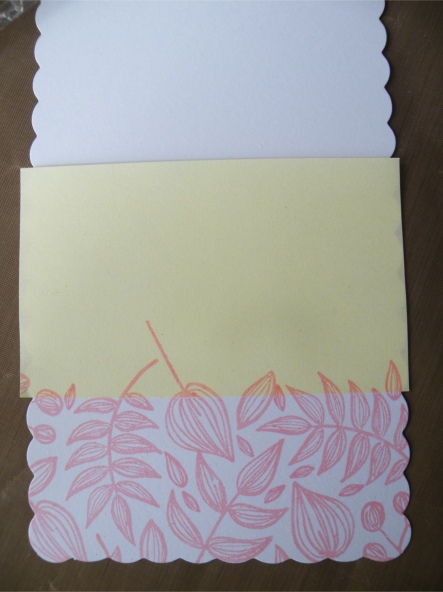
Here I used Altenew Freeform Greenery, which is a set full of outline-only leaves, in many forms and sizes. When I first came across this stamp set I was not sure, but the more I saw them, the more possibilities there seemed. Then they went on SALE! Which meant they now have a forever home with me. It was an easy decision in the end!
So, we have a masked off area filled as much as possible with stamps. Now remove the masking tape carefully and add a suitable sentiment just above the line of stamping.


Maybe a knotted band of ribbon at the top and job done. Took way longer to write and photograph than it did to make!

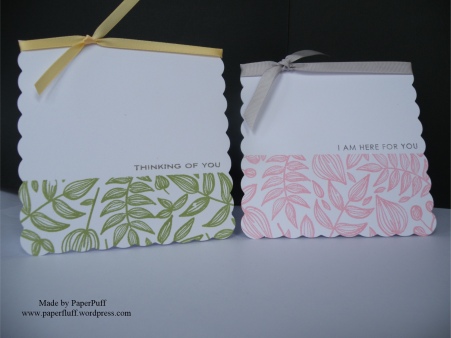
I used more than one stamp set here, but a beginner could easily choose one set with a mixture of greetings and images, just to try it out.
I’d be interested to know if you think posts like this are a good idea or whether I am teaching grandmother to suck eggs. A phrase which I have never understood and always found frankly bizarre. Try a mental image of your gran doing it. See?!
Supplies from Altenew:
stamps: Freeform Greenery, Sentiments and Quotes, and Thinking of You. Inks: Cotton Candy, Forest Glade and Moon Rock
Ribbon and card from stash.

I always think that the masking-off technique looks like it’s a very accomplished technique, leaving recipients thinking ‘how did she do that?’ when in fact it’s easy to achieve. Well, easier now I found some stencil tape that doesn’t take a layer of card away with it when you peel it off! I think this post is a good idea (do you ever have any other?!) so keep ’em coming 🙂 There’s loads of stuff that I haven’t a clue how to do!
LikeLiked by 2 people
I can’t imagine there is anything you don’t know how to do! Masking tape drives me a bit nuts too. It seems to be like fruit that goes from unripe to liquid within about a four hour window. It is way too sticky, way to sticky, ‘felt it’ a bit and still too sticky, then suddenly no stick at all! Grrrr!
LikeLiked by 1 person
Lol! I’m a complete craft fraud! There’s so much that I don’t know how to do or haven’t tried! But thanks for having so much faith in me :-)!!!
LikeLiked by 2 people
Aaaah, but when you do try it, it will be BRILLIANT!
LikeLiked by 1 person
These are gorgeous. As you know I am a huge fan of your cards and the professional finish you achieve. This kind of post is a great idea. Whether you are an old hand or a newbie at stamping or card making it is always great to see how someone has made something. Sometimes it could be just one word or one sentence that someone puts in their post that sets off ideas. It is what you are happy doing that is important. TFS as always.
Flo x
LikeLiked by 2 people
Thanks Flo! I know exactly what you mean. I think that is one of the joys of blogging – plus you get to ask questions! I have been way more inspired by other blogs than by the magazines I used to buy. Thanks for the kind words. Xx
LikeLiked by 1 person
LOVELY, Gillian!
LikeLiked by 2 people
Thanks, Kathy!
LikeLiked by 1 person
Sorry! Completely forgot to say how pretty these cards are! Doh!
LikeLiked by 1 person
Lol! Thanks!
LikeLike
so cute!
LikeLiked by 1 person
Thank you!
LikeLike
A very good idea – I need to do more visual tutorial on my blog – showing rather than just telling.
LikeLiked by 1 person
Thank you. I think sometimes it is easier for me to just take a picture than to try and explain in words only. And showing is good for beginners, I think.
LikeLiked by 1 person
Beautiful card. Have seen this technique but never tried it as of yet. Good tutorial 🙂
LikeLiked by 1 person
Thank you! It is a doddle. Let me know if you try it?!
LikeLiked by 1 person
I will do 🙂
LikeLike
Lovely card and great instructions, the sort of thing I would need! 🙂
LikeLiked by 2 people
Thank you. It is one of those ‘easy when you know how’ things. And pretty much everybody needs instructions for something outside their comfort zone!
LikeLiked by 1 person
I love your work so much!! Thanks for sharing.
LikeLiked by 1 person
Thank you!
LikeLiked by 1 person
I love these cards…sooo pretty!
LikeLiked by 1 person
Thanks so much!
LikeLiked by 1 person
Love your creations!!
LikeLiked by 1 person
That’s a really fab simple effect. I also think your series is a good idea, as I no longer seem to spend hours on one card and prefer the grab and go method. (This is normally due to appalling organisation!) I definitely need inspiration! 😊
LikeLiked by 1 person
Maybe I should have called it Guerrilla Crafting!! So, we need maximum impact with minimal time and supplies. Will put the thinking cap on!
LikeLiked by 1 person
You’ve got it! Thanks, my cardmaking has been sadly neglected lately but I still enjoy it when I get the chance. I’ll keep an eye out for inspiring ideas from you. 😊
LikeLiked by 1 person
What a great idea! I am always looking for ideas for quick cards so I look forward to seeing what other ideas you come up with. I love this effect. It’s such a lovely idea!
LikeLiked by 1 person
Thank you! I’m looking forward to seeing IF I come up with anything else!!
LikeLiked by 1 person
Keep these posts coming! This is a really neat idea and I am going to have to try it.
About that egg-sucking grandma thing……I have eggs, I am a grandma….you are right that is quite a visual! LOL
LikeLiked by 1 person
Ooh I’d love it if you made some cards for us to see! And now I have a mental picture of you and an egg…..
LikeLiked by 1 person
LOL on the mental picture!
LikeLiked by 1 person
Oh this is great! I always start out thinking I am going to make a quick card, but always end up taking a lot more time that I intended to spend on it! There are a lot of times that I need a quick card, but unfortunately draw a blank. Thanks for sharing this. I’m definitely going to try some “quick and simple” cards! I might be able to get more cards done by doing that! Ha! Great cards by the way! I need to make some to have on hand when something unexpectedly comes up! 🙂
LikeLiked by 1 person
That was my plan too – if I just make the base and then add whatever sentiment is appropriate I should always be prepared. Probably will never happen though! Your colouring is your speciality. I’d be very interested in seeing this on quick and simple cards. Post them in a blog if you do some?
LikeLiked by 1 person
I will certainly give it a try! Hopefully I can make myself stop with a simple card! LOL!
LikeLiked by 1 person
I do love this series and these cards are both wonderful! I knew about this technique, but haven’t tried it on my own.
Masking tape really drives me crazy sometimes, but I’ve been watching some tutorials recently and noticed, that most of crafters are using washi tape instead! Fortunately I’ve purchased three rolls of it at Target for $1/each and I should admit, that it works way better for keeping dies in place. No sticky residue and tears (in any meaning) so far!
So now you gave me one more idea (‘writing it down’) – thank you! It always takes more time, than I planned, to create something, so your series will be helpful!
LikeLiked by 1 person
Thank you! I have seen washi tape being used too, but I don’t have much of it and for some reason shops don’t stock it so much here, so I don’t like to ‘waste’ it! Maybe I’ll try and find one I don’t like!
LikeLiked by 1 person
I also don’t really like mine as it looks more like semi-transparent paper, than typical washi. I’ve also ordered a roll of artist’s tape… I’ll let you know if it works.
LikeLiked by 1 person
Please do!
LikeLiked by 1 person
That is so pretty in green! I’m pretty sure I couldn’t do that in 15 minutes. It would take me 10 to find a stamp set I thought would work. Then at least another 10 to stamp, mess it up, and start all over again.
LikeLiked by 1 person
Psst….you can start the clock from whenever you like…! You can do it, easy.
LikeLike
Really good idea! Often looking for quick makes, and I do something similar with distress inks, but his is quicker! Bootiful! 🙂 x
LikeLiked by 1 person
Thank you. I’d be interested to see what you do with the distress inks.
LikeLiked by 1 person
Love these!
LikeLiked by 1 person
Thanks!
LikeLiked by 1 person