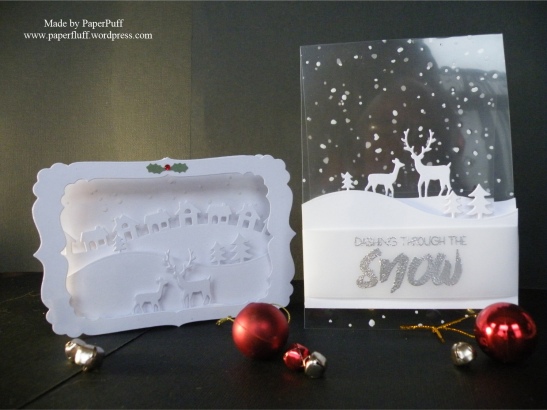
Whilst rummaging in the craft room at the weekend I came across some snowy acetate I bought a couple of years ago. Nothing like rediscovering an old friend, is there? I decided to give it a bit of a workout. Also, those who read my posts regularly may remember that a vital Christmas die went missing a few weeks ago. The guilty party is either the cat or a poltergeist, because the die was returned last week. Left in the middle of the living room floor. Hmmm. I am pretty sure forensic testing would detect kitty DNA, or at least tuna… Anyway, it is back so Christmas is no longer cancelled.
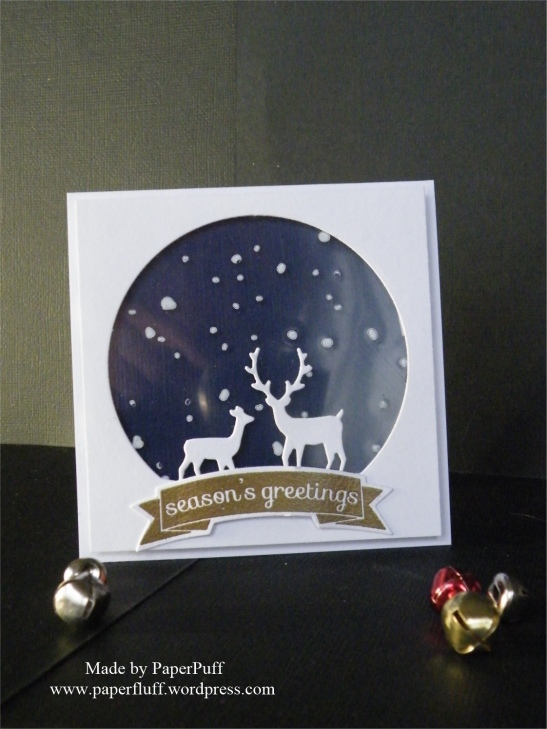
To the cards, then. The first ‘degree’ of difficulty, is well, not in the least bit difficult really. I used the Deer Family die as it is, plus a banner greeting. A square of the snowy acetate was layered over royal blue card for the background sky, 3D foam and done. Total absolute beginner level. I think it would be good for a male Christmas card, maybe?
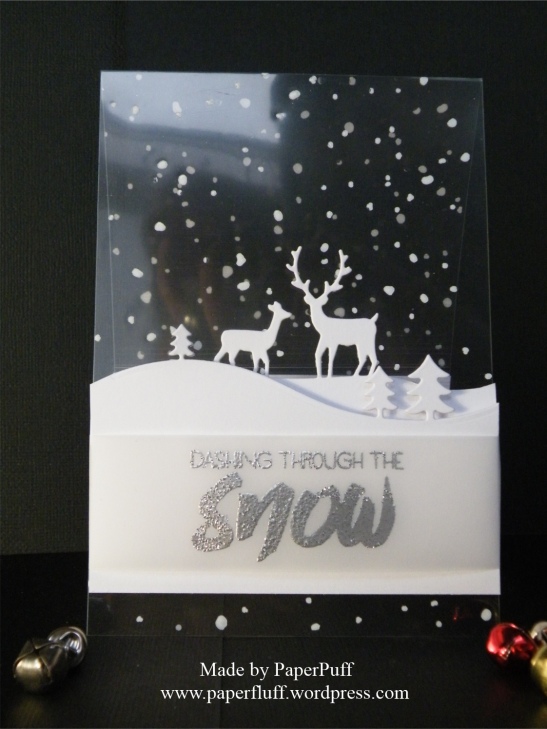
For the second degree, well there was a bit more thinking required for the composition, but once that was done it was simple to put together. Here I have used acetate to make the base card: it is sturdy enough to stand up with no problem. This time for the Deer Family I cut away the circular dome, so they are just silhouettes on a strip of card. I stamped and embossed the sentiment onto vellum and then wrapped the vellum around the layer with the Tree Landscape and adhered this to the piece with the deer. For acetate cards you need to tidy up the inside too, so nobody sees the gluey mess that is your shame. Just cover it up with another bit of card and nothing to see here! You also need somewhere to write. Well, unless you don’t like the recipient enough to bother, but then why are you sending the card?! My top tip for this (only thought of it today) is to flip the card over so the front is facing down on your work surface. Now you can easily layer a panel to line up with whatever is on the card front. Then you can turn the card the right way up, open it and align the interior panel perfectly with the one you have stuck to the very back of the card. Hurrah!
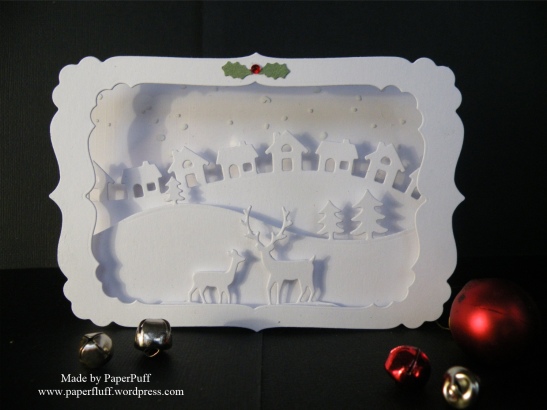
Now, the third degree of difficulty. I could have done with a lie down in a darkened room after this. All the dies are from different companies, so not intended to be used together but I had in my head that a diorama style would be fun. Fun for who, exactly?? I jest. It was a good thing to try and I felt I had achieved something. I’m not going to explain how I did it, because part-way in I had a bit of an epiphany and may have come up with a better and easier method. I will test it out and share if it works.
I do have a question to throw out there though. I want a detail gold embossing powder that is a really rich, bright, warm gold. The one I used on the first card here is, to be fair, at least 12 years old, but it is too ‘muddy’. Also, it MUST be a detail powder. Anyone got any recommendations? Oh and acetate, nightmare to photograph. I think you can see the roof of the house across the road in one of these shots and our guttering in another….how picturesque!
Long list of supplies today:
Clearly Besotted Tree Landscape and Mini Basic Banners dies; Lawn Fawn Village Border die; Memory Box Deer Family Circle die; X-Cut Rectangle Parenthesis Large dies; The Ton Holiday Lyrics (Dashing Through the Snow); Clearly Besotted Mini Basic Banners III stamps; Hunkydory snowy acetate. Rest of supplies from stash.

Lovely! Really pretty…for some reason I feel I need acetate…but I don’t make cards…but they’re so..so..pretty!
LikeLiked by 1 person
Lol! Well unless you make cards or boxes, really you probably don’t need it. But then, I am wondering if I need a crystal or two!!
LikeLiked by 1 person
Yes. Yes you do. Crystals are good, but so is snowy acetate…
LikeLiked by 1 person
Next time I visit my sister I might come away with heavy pockets. What would you use snowy acetate for though? Or is it just in case of an acetate related emergency?
LikeLiked by 1 person
Hmm I’m not sure…possibly some diorama type thing…although it would be more for mine and the cats’ amusement now my kids are older..like a change scene frame change thing for cartoons..could have Santa Claws flying across the night sky…ha ha…time for my tablets I think!
LikeLiked by 1 person
Ha ha!. I see Nurse Ratched approaching too…
LikeLiked by 1 person
*laughing maniacally*
I’ve not been well…you know…!!
LikeLiked by 1 person
Take the little pink ones…or are they blue…spotty…oh no, the knitting pelican is back on the sofa again…
LikeLiked by 1 person
YOU SEE HIM TOO??
LikeLiked by 1 person
Only when he’s not at your house…
LikeLiked by 1 person
Well, there’s no room in the wardrobe and he’d better not go near the Walnut Whips…
LikeLiked by 1 person
No worries. I am fashioning a bird house from Jelly Tots and Curly Wurlys
LikeLiked by 1 person
Curly Wurly is my favorite. I have to get them from this one candy shop, but they are equivalent to what we called a Marathon bar when I was a kid. It was my favorite candy bar. The company went out of business; I am so happy to have found your curly wurly bar. Sorry, to jump in on you I was just excited to know what treat you were discussing!
LikeLiked by 1 person
Feel free to jump in any time! Interesting, because here a Marathon bar is what we now have to call a Snickers. I say ‘have to’ because you would not believe the hue and cry about the change of name at the time. It was like we had been told that due to globalisation we were now going to be called Little America instead of Great Britain!!
LikeLiked by 1 person
It is a snickers, really? Why a marathon, they are labeled “king size” here! Love the analogy.
LikeLiked by 1 person
So a Marathon/Snickers is peanuts, caramel, some kind of fudgy or mousse layer at the bottom and covered in milk chocolate. Similar shape to a Mars bar. A Curly Wurly is a sort of drizzled, thinnish flattish layer of chewy caramel covered in Cadburys chocolate. Doesn’t sound exciting, when I put it like that!
LikeLike
Yep that describes both. I think Snickers are idiots to rename their product, I would be so upset if I was visiting, bought a marathon only to find out its really a snickers. The term you are looking for to describe that bottom layer is “nouget”. We don’t ask what it is comprised of similar in thought as not asking what makes up hot dogs.
LikeLiked by 1 person
Lol, yes, better we don’t know!!
LikeLike
I really need for you to either move or visit the Midwest US. I just feel the need for a card making class with you as a teacher :).
These are so pretty!
LikeLiked by 2 people
Lol! Maybe we shall have to try correspondence course!
LikeLiked by 1 person
That might just work :).
LikeLiked by 1 person
So beautiful…ohh your getting me over excited for Christmas!!!
LikeLike
Wonderful trio, Gillian! That diorama is spectacular!
Gold Detail embossing powder…I have Stampendous! brand, and I really like it. You can see it on my die cut wreath cards (all of the sentiments).WOW and Ranger are also supposed to be good. (I have other Ranger metallics – Silver Pearl, Liquid Platinum, and the “fineness” is superb.)
LikeLiked by 1 person
I checked back on your post – the gold does look like what I want. Maybe that is why it was in my head! I can get that brand here too. Thanks Kathy!!
LikeLiked by 1 person
Mine is labeled “Detail Gold”.
LikeLiked by 1 person
I will go shopping…Thanks again!
LikeLiked by 1 person
Very festive! I like a bit of acetate, snow acetate sounds like heaven. I can’t help with the embossing powder as my gold sounds like yours too. Glad the cat returned his stash, did you announce an amnesty in return for fish?
LikeLiked by 1 person
Pretty much. Tuna is a great incentive…
LikeLiked by 1 person
White on white and white “on clear” are so pretty!
LikeLiked by 1 person
Thank you. I have made a lot of ‘mostly white’ cards this year. Probably because I bought a great big box of white card!!
LikeLike
Aww, these are just lovely! So clean and easy on the eye. These will really stand out on the shelf at Christmas! Love them
LikeLiked by 1 person
Thanks Cobs!
LikeLike
Fabulous cards Gill! The acetate card and diorama are pretty spectacular!
LikeLiked by 1 person
Thank you Karen. I really want one of those sleigh border dies to use for these, but maybe next year!
LikeLike
Gorgeous makes. Love how you have used the acetate. The effect is wonderful.
Hugs Flo x
LikeLiked by 1 person
Thanks Flo!
LikeLike
Wow thats really awesome!
LikeLike
Oh I love WoW embossing powders. Their gold is nice but I especially love their Hearthrob gold and red mix glitter for Xmas.
LikeLiked by 1 person
Ooh, that sounds good. Thanks for letting me know!
LikeLiked by 1 person
Acetate looks tricky to work with but all 3 cards look marvelous! I’m glad you asked about embossing powder; that means more glittery/flashy cards are coming (maybe)!
LikeLiked by 1 person
You just have to show the acetate who is boss really. Or else give up and make a cup of coffee! And yes, no doubt more glitter to come. I do have a mountain of it after all!
LikeLiked by 1 person
They are all stunning, can’t choose between them! 🙂 x
LikeLiked by 1 person
Thanks Kim!
LikeLike
They are all beautiful cards!! I love that first one the most I think. Something about the deer and that blue background. Love all 3, really. Great work!!
LikeLiked by 1 person
Thanks very much!
LikeLike
White cards are simply stunning. Not sure if this helps but i use Memento Dew Drops inks
LikeLiked by 1 person
Thanks. I am definitely in a ‘mostly white’ zone at the moment!
LikeLiked by 1 person
white is so effective 🙂
LikeLiked by 1 person
Thank you!
LikeLiked by 1 person
Three degrees of loveliness! So glad Riley brought your edgelits die back; guess he didn’t want to miss out on Christmas fun this year after all! https://www.youtube.com/watch?v=YUOjKEHUn7k
LikeLiked by 1 person
Oh, that has absolutely made my day!! Thank you for sharing it with me!Xx
LikeLiked by 1 person
Oh, good, the link worked – I got such a kick out of that!
LikeLiked by 1 person
So did I, and my mum, and my sister….
LikeLiked by 1 person
Oooooh they are all so lovely! I paricularly like the second one though. Such a great idea! Gorgeous!
LikeLiked by 1 person
Thanks!
LikeLike
These cards are great!I love the ideas.
LikeLiked by 1 person
Thanks very much!
LikeLike
Wow! Second one is my favorite, but all three cards are very beautiful and creative! I like how you used all these elements together.
About the embossing powder… I have Stampendous! powder in gold, but I used it only once and can’t really rate it’s quality, but at least it works for embossing and it’s gold, not rose gold or something else.
LikeLiked by 1 person
Thanks! Actually when I opened a drawer today I found some of that exact powder. It was in totally the wrong place and I had forgotten I had bought it! Second one is my favourite too!
LikeLiked by 1 person
It’s a common issue! Hope it will work nicely for you!
LikeLiked by 1 person
Oh my word! These cards are just AWESOME! I so love the look of all three cards! Beautiful job…STUNNING! I have never made a card with acetate, but love the look of them. I just may have to try it sometime! Have you ever tried Gina K embossing powders? I have several and LOVE them. They are super fine for details. 🙂
LikeLiked by 1 person
Thanks Nancee, and no, I haven’t tried Gina K. Not sure if they are available over here but I will check them out! The acetate is quite dramatic-looking I think. I must have been having a Diva day!
LikeLiked by 1 person
It is dramatic looking! I ❤️ the look!
LikeLiked by 1 person
I love this project! The work you do with the materials you use is amazing! All I was thinking while reading your post was “why is she not teaching classes?” or at least on youtube. At least get yourself an Etsy shop so we can buy the tutorials!
As for taking pictures of acetate, or clear things, given the fine detail of your work I would suggest getting a photo box. It has a light in it and all white sides. Amazon sells a pop-up starter (easy to set up and store) kit pretty cheap. You could also find one in a local photography store.
For glitter, I would check Tim Holtz’s site or Ranger. I thought I just saw a bottle of tonic fine glitter in a more burnished gold. Hope that helps!
LikeLiked by 1 person
It does help, thanks! I always like to know what others recommend. I will look at the photo box kits too! As for videos, I am the MOST camera shy human being. And I know most people only show their hands but even that would give me pause a bit. Then I might have to explain something and I’d have to talk and probably just freak out!! Thanks for the support though, you say such kind things!!
LikeLiked by 1 person
I feel the same way, my son once said Just because you do a video doesn’t mean you have to upload it. It helped me a bit. Try it, you might like it! :):):) Anyway, you writing is fabulous and always enjoyable which why I think we want more!
LikeLiked by 1 person
Ooh, top marks for your son!! That is very good advice indeed. Say thanks from me!
LikeLiked by 1 person
Really like “Dashing through the Snow.”
LikeLiked by 1 person
Tthanks very much!
LikeLike
The acetate base card is fabulous! I kind of want to try and do one (or a vellum based one), but I don’t think I’m brave enough yet… 😛
LikeLiked by 1 person
Firstly, I am pretty sure you can do anything because you are a great card maker, and secondly, no bravery is required. Just strong enough acetate!
LikeLiked by 1 person
Aw, thanks 😀 I know I still have a lot yonlearm with card making and it’s difficult sometimes not to negatively compare myself to more experienced card makers. I have some acetate somewhere… I’ll have to try and find it and see about having a go 🙂
LikeLike
Gorgeous as always. This die is so sweet.
I love my snowfall acetate, I use it a lot around Christmas.
LikeLiked by 1 person
Beautiful card and maybe your cat is secretly crafting (and has a hidden stash of supplies…)
LikeLiked by 1 person
Lol!
LikeLike