Sorry Trekkies….
Last year on Pinterest I saw lots of Christmas ornaments with a honeycomb paper look. Now, I can just about remember from childhood many Christmas ornaments being made from honeycomb paper. They would be something like a bell, or a tree, probably about a foot long. They would be multicoloured, and be able to open for the festivities and fold closed again to store for next year. The honeycomb effect would be quite elaborate too. The ornaments I saw on Pinterest were handmade, and therefore much less elaborate, but really appealed. Also many were made with book pages. I wanted to try it last year but never had the time. I know some people feel that books should not be cut up, or cut into, but I feel differently. I love books. I love to read them, flick through them, even pile up old interesting looking ones simply for decoration. But I also just like the look of the text and the feel of the pages, so using them as a craft material is fine, for me. Otherwise these books are sitting alone and unloved in a charity or second-hand shop somewhere. Where is the glory or dignity in that? If you feel differently, it’s ok, just look away now and come back another day maybe?!
Still here? OK. So, yesterday I watched various YouTube clips to see how to make the honeycomb paper effect. Then armed with some knowledge I waded on in. The method I came up with was a bit of a mixture of the videos I watched. Isn’t that often the way? If anyone wants to know specifics just let me know in a comment and I will put something together, but really if you fancy having a go there are plenty of tutorials already available.
I used an old book of Shakespeare plays. Probably just a twisted amusement at making something which vaguely resembles an Elizabethan ruff from The Bard’s works. Or shall I pretend it is in homage?! But for the record I don’t actually see Shakespeare’s visage in honeycomb paper, or on my toast, like some people do…
As I said, I won’t go into masses of detail, but basically you cut your shapes, fold them in half and then stick them together one on top of the other, but alternating the sticking points. Really, seriously, I can try to explain this more but other people have already done it way better so I won’t. YouTube is great for this!
Once you have your basic shape done, again you have choices for the hanging loop and decoration at the bottom. Or at least you would have choices if you were a crafter with a selection of beads to hand. I am not, so ended up using a snowflake charm that was free with a magazine about a million years ago.
I wanted more bling. I wanted those pages GLITTERED! A rifle through my glitter stash and I plumped for Smoky Quartz by Martha Stewart. It is an old-fashioned kind of colour, exactly what I had in mind. So late last night I was sitting painting diluted pva glue onto the edges of the pages and then liberally sprinkling with glitter. Some pages are a bit more glittery than I would like, but too late now. Next time I will do the job in better light. I also decided I loved the glitter so much that I added it to some simple die cut holly leaves too and stuck these at the top of the ornament.
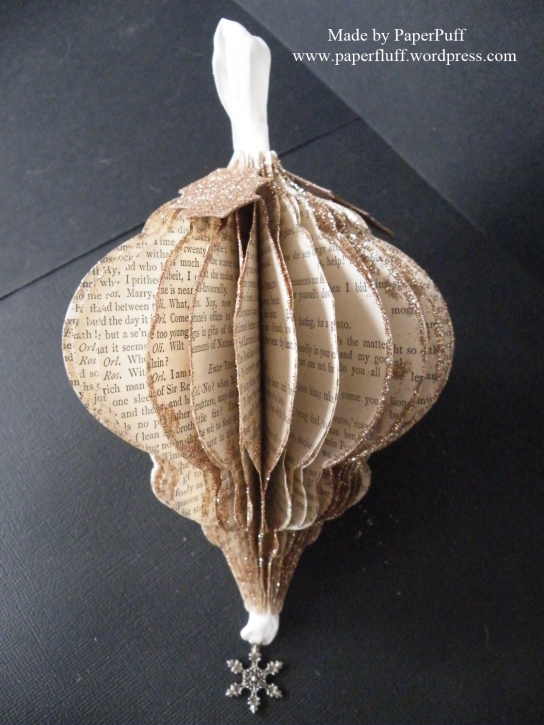
What I learned from this first one is that it is worth taking some time to work out the position of your fixing points. This ornament could have looked better with a different choice I think, but now I know.
Also, glue dots seemed to be the weapon of choice for a lot of the YouTube-ers, but I gave up on them pretty quick. You simply cannot easily see where you are putting them because of the carrier paper. I just used a sticky tape runner and it worked fine.
I know you would have to be very careful about where you placed a decoration like this but I do find them interesting to look at. Again this is another project that you absolutely could replicate without a die or die cutter. Just draw half a simple ornament shape, cut it out, draw around it on your already folded book pages and you are good to go.


The die I used was the largest from Spellbinders 2010 Heirloom Ornaments

How clever and something I could absolutely not do…that way tears, frustration and tantrums lie…really cleverly done and a unique little ornament 🙂
LikeLiked by 2 people
Thanks, but honestly it is easy. I really can’t do difficult either! I nearly called this post ‘smoky quartz and Shakespeare’. Can’t think where I got that idea……
LikeLiked by 2 people
Lol! Yes I noticed the name of the glitter ( nodding approvingly ) and with such a witty interpretation of course the two begged for a link..however…I must confess I am not a Star Trek fan…
LikeLiked by 2 people
Erm, not even Captain Jean-Luc Picard? A member of the RSC? See, I don’t just throw these things together you know!!!
LikeLiked by 2 people
Meh..bald. Beautiful speaking voice though..
LikeLiked by 2 people
I don’t mind bald, never have. Never actually had a bald other half though….so maybe this is only a theory…
LikeLiked by 2 people
This struck me as unbearably funny…oh dear, not sure why really 🙂 My partner is receding and tells me I won’t mind when he’s bald..lol!
LikeLiked by 2 people
(muffled snort) maybe the proof of the balding is in the slapping??!
LikeLiked by 2 people
HA HA HA!! Don’t..I saw a freaky thing on the Internet….a bald man had his face painted on again on the back of his head!!!
LikeLiked by 2 people
Seriously? I can’t help but wonder if tattoo parlours should have to adhere to ‘cooling off’ clauses. Just so no eejit can wander in and change their life on a whim. Imagine waking up to that every morning!
LikeLiked by 2 people
Lol…but he could say he had eyes in the back of his head and REALLY mean it…!!
LikeLiked by 2 people
Or maybe he was two-faced?!
LikeLiked by 2 people
Or confused…didn’t know if he was coming or going!
LikeLiked by 1 person
Oh that’s lovely! I’ve made ornaments out of old cards (both as a kid & with my own kids) by cutting circles and glueing 4-5 of them together, then rolling the edges in glue & glitter – but this is so much fancier!
LikeLiked by 1 person
Thank you. The versions you made sound good and great fun.
LikeLiked by 1 person
Yet another amazing 3D project! I love this ornament and what a great idea to use old books! I’s have to watch tutorials on this for ages before it would commit to my memory so for you to make it straight after watching some vids – pretty amazeballs actually!
LikeLiked by 1 person
Thanks Karen! There is no guarantee that I will remember how to do it by tomorrow!!
LikeLike
Very nice, Gillian! I am with you on books – better to use them for crafting that to have them rot not being enjoyed at all. Do you know how many layers you actually used?
LikeLiked by 1 person
Thank you. Yes, I cut 24 whole shapes. You have to do even numbers. I probably could have used 20, then the honeycomb look might have been more obvious, but too few and it would tear as you stretch it round.
LikeLiked by 1 person
Thank you for the info!
LikeLiked by 1 person
Ooooh! I really like this! AND great technique photographing with the black background.
LikeLiked by 1 person
Thanks Wendy! I only had to take about 50 photos to get a few decent ones….!
LikeLiked by 1 person
I vaguely remember making something like this …about 100 yrs ago when I was at school LOL the memories you have brought back with your beautiful ornament are priceless so thank you for the stroll down memory lane 🙂
LikeLiked by 1 person
I loved the noise the shop-bought ones made. Crackly and rustling at the same time! Thanks for the kind words!
LikeLiked by 2 people
No access to beads huh? I have a room full of them and you only have to ask! Looks great though – a pretty version of a nostalgic favourite. Xx
LikeLiked by 1 person
I know, but I only started this last night and you are not exactly next door, are you?!! Just put some aside for me – ones with decent sized holes to get ribbon through!! Glad you like it. xoxo
LikeLike
This is awesome!!!
LikeLiked by 1 person
Thank you!
LikeLike
Outstanding!! I may have to put elves to work while their on break from school next week.
LikeLike
Lol! It will keep them good and busy though!
LikeLike
love these!
LikeLiked by 1 person
Thank you very much!
LikeLike
How beautiful!
LikeLiked by 1 person
Thank you!
LikeLike
Think I know what I’m going making tomorrow!
LikeLiked by 1 person
Share if you do?!
LikeLiked by 1 person
Definitely!
LikeLiked by 1 person
What a gorgeous shape. I’ve seen a fairly similar effect with circles to make 3d hot air balloons on cards and I thought they looked cute. Great use of a book. Charles Dickens’ A Christmas Carol would be a great book for Xmas decorations too. 😊
LikeLiked by 1 person
Yes, absolutely! Probably the most fitting book really!
LikeLike
Oh what fun! Hmm…I’ve given away most of my books…Kindle is much easier to carry several books around….maybe some garage sales would be a great place to shop for these supplies! What a fun idea! Probably won’t give it a try this year…not enough time. I love the looks of these! Beautiful job! So glad you try these things first and give us tips on how to make them! 🙂
LikeLiked by 1 person
Christmas is coming up way too quickly, isn’t it? I am starting to panic a bit. I have just realised as I was replying to another comment that these are a bargain to make. The only things I had paid for at some point was the ribbon and the glitter, neither of which cost much either! It does actually look prettier in real life too, so I think I might manage a few more…maybe…
LikeLiked by 1 person
🎄 is coming way too soon! I always say I am going to start early but I never seem to do so. 😂
LikeLiked by 1 person
Snap!
LikeLike
This is so beautiful! Love the look of this paper and a snowflake charm!
LikeLiked by 1 person
Thanks! The only thing I actually had to pay for was the ribbon and the glitter. Everything else was free or repurposed!
LikeLiked by 1 person
I have Spellbinders Heirloom Reflections die set, so maybe I’ll try creating something like this later, but I don’t have any books, that can be used this way. Maybe parchment paper will also work fine.
LikeLiked by 1 person
Yes, I would imagine parchment would be fine. You just need something really quite flimsy. Copier paper would be ok too I think.
LikeLiked by 1 person
Maybe copier paper would work, but for some reason I don’t feel it like a medium and never use. If I had a ‘Text’ stamp, I would probably have stamped it on parchment paper and used instead of book pages. I really love how it looks with text!
LikeLiked by 1 person
Maybe newspaper?
LikeLiked by 1 person
Oh, yes! You are genius! Somehow I didn’t think about using newspapers… maybe it’s a professional thing or it’s because we are not buying newspapers here and reading everything online.
LikeLiked by 1 person
That is a very neat ornament! I have several old Psalter Hymnals from when our church purchased new. This would be cool using the Christmas song pages!
LikeLiked by 1 person
Well, they would be totally the perfect thing to use!
LikeLiked by 1 person
Picking up my jaw. This is amazing! the glitter is icing on the cake. I agree the text add another dimension. I knew I was in for something really good when I read the title, you do not disappoint! I have been so sick and you have given me the first laugh in two days, thank you! I do think you should do youtube you would make it so fun. Think about it! 🙂
LikeLiked by 1 person
Oh, so sorry you have been unwell. Hope you feel better now. That glitter colour is SO good. I wish I had a bathtub full of it! Glad I made you laugh a bit:-)
LikeLiked by 1 person
You always throw something in that makes me laugh. Now start a youtube channel so we can craft and laugh along with you. 🙂
LikeLiked by 1 person
I will think about it…
LikeLiked by 1 person
I am always looking for something different but easy. I like to craft but can’t do the fancy stuff. This one sounds doable.
LikeLiked by 1 person
Yes, absolutely, it is very easy and once you have the base shape made you can decorate however you fancy.
LikeLiked by 1 person
Aww, now that’s really pretty! I love the choice of glitter. It’s perfect for the project.
How long would you say it took you to make it, from start to finish?
Great make! ~ Cobs
LikeLiked by 1 person
Thanks Cobs! I think it would take maybe about 45 mins to make one from scratch, once you have a plan. Because my plan was, shall we say ‘fluid’ (i.e. the scantest of scant) it took me a lot longer for this first go. 6. Hmmn. That random ‘6’ there is Riley, who just stood on the keyboard to say ‘hi’. I think he likes you.
LikeLike
I think that perhaps it was more that he took a bit of a shine to Maisie Dotes, who had decided that I wasn’t to do anything at all except cradle her in my arms and tickle her tummy … because I am her slave.
That ornament would take me a LOT longer than 45 minutes. It’s a pretty little thing, but I don’t think my one brain cell has the required patience factor to sit and glue all the bits in the right places and not get glued up to the eyeballs and eventually be part of the bauble permanently.
LikeLike
Love the traditional, old fashioned feel of these ornaments. Very pretty! I know exactly what you mean when you’re looking for how-to’s on the ‘net and find thirty-nine thousand of them, not one of which is perfect or tells you exactly what you need to know. Having said that — hurray for YouTube and web DIYs … where would we be without them?!
LikeLiked by 1 person
Yes. Last year my cousin was trying to make some jester-type shoes for her son in his school play, but was probably going to give up and put him in coloured gym shoes that went with the rest of his costume. I managed to find a pattern and YouTube demo on how to make pointy shoe covers to go over the gym shoes. What are the odds?!
LikeLiked by 1 person
ohh..that’s sooo pretty!
LikeLiked by 1 person
Thanks!
LikeLiked by 1 person
😉
LikeLike
I love it! And I have examples of all sorts of pretty things made out of old books on one of my Pinterest boards – not that I have made all of those things yet myself – but one of these days… Now that you’ve made this honeycomb and glitter ornament I have an incentive to get going!
LikeLike
Exquisite!
LikeLike
Beautiful. So talented 🙂
LikeLiked by 1 person
Thanks! But they are actually easy!
LikeLiked by 1 person
This is me remember lol. Honestly love all your creations 🙂
LikeLiked by 1 person