Welcome to 3D Thursday!
Some people may remember a little while ago I was asking how other bloggers plan their posts, do they have a structure, do they schedule ahead and so on. Whilst reading the responses (and thanks again to everyone who took time to comment) I began to get a few ideas in my head, and one thing I realised was that I wasn’t posting anything much other than cards, yet I love making 3D objects too. Maybe this was worth pursuing?
I decided I would try a regular 3D-something post each week and see how I go. Hopefully I will at least make it to week 3 anyway. The irony of failure to do this would not go unnoticed.
Not wishing to raise anyone’s expectations for the future, not everything will be quite on this scale, but on week one I thought I may as well go all in.

This is a Tattered Lace Retail Therapy shop. Cake shop, obviously! Well they say if you want to write about something, start with what you know…. And this will be something of a novel because I thought I would write a review, of a sort. Non-crafters, feel free to look at the pretty pictures only! Well, anyone can really….

This was my first attempt. I bought the bundle which gives you dies for the shop exterior, three different interiors and a CD-ROM with images to match the dies, backgrounds etc. There are absolutely tons of dies so lots of scope to change the look of your finished project every time, should you wish. The detail for the shop exterior is amazing – all sorts of different architectural features, hanging baskets etc to play with.
I started off by looking at the CD-ROM, which is a Click, Print, Go! product. This should mean you just open, browse through the selections and then print your choices. You do not want to resize the images as they are made to fit the dies. However, the running programme does not work with my Windows 7. I had contacted Tattered Lace about this in the past and to be honest I was a bit let down by their response. I felt that if they knew it was a problem then they should mention it, or fix it. Maybe I just got them on a bad day, but whilst waiting for them to get back to me I found my own solution. I copy into Serif CraftArtist, and although the image sheet comes in too small I just resize it to exactly A4 and it works fine. If you have had the same experience and have got CraftArtist then this may work for you too. I was hoping the issue might have been fixed by now, but I still have to go through the procedure with this new CD-ROM. It works, but it takes longer and means I have to wade through lots of file folders instead of whizzing through screen images. Because of this I didn’t go through everything on the disk, just found some colours I liked and made a start.
I chose a bright blue and soft green combination, and cut the shop shell first. Be aware that if you have colour on only one side of your card, because you will be folding two parts (the canopy and the support at the base) back on themselves, you will end up with white showing, as you can see on the base in this shot here.

For the canopy you are likely to be covering it with lovely scallop shapes anyway, and for the base I just covered it with some more of the blue. It’s not a problem, just don’t think you have done something wrong! Of course though you could use some card coloured on both sides. The construction is pretty obvious, and included on the packaging anyway.
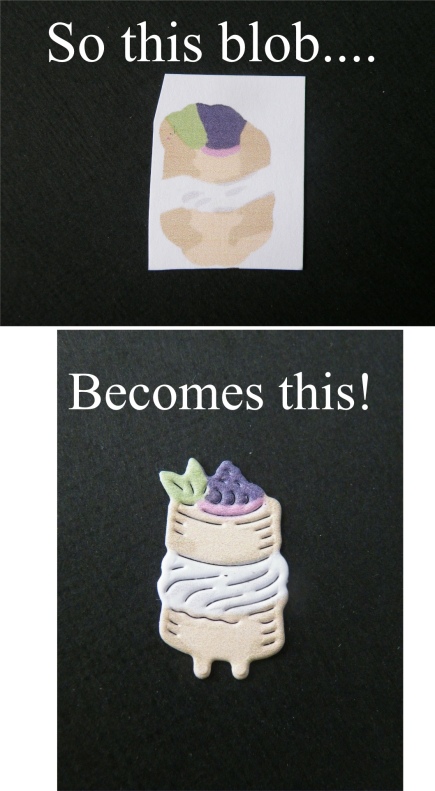
Now for the shop window! The images look weird when you print them, some almost unrecognisable. It’s a bit like a party game…hmmn…what might that be…but don’t worry, they are actually pretty genius. Helpfully all the dies are labelled, but I did have a few head scratching moments trying to match them to the printout. Once you have that sussed, just centre the die on the image and cut it out. It is amazing how an out of focus blob suddenly turns into a scrummy cake! I was majorly impressed with this. There may have been a dance…
You also have shelves, cake stands, a little menu board, a tea service, loads. All the images have a couple of little notches that slot into slits on the shelves to help them stand upright. Nice!
I thought it would be clever to attach the base at the right hand side only to a piece of card big enough to then fold in half at the left hand side once all the detail had been added in, thus making my base card. Like this…

When will I learn? NEVER try to be clever. The lovely stiff card I was using simply did not want to fold close enough to the card edge for my liking, giving me a semi-spotted small rim down the spine. So I chopped it off instead. Probably a much better idea to stick a very slightly smaller (by a couple of millimetres) card to the back afterwards, or just provide a pretty die cut shape (with double-sided tape to affix it) that the giver can write on.
There are some helpful instructions on the Tattered Lace website, in the Downloads section. I didn’t look at these until after I had finished of course. I should have checked them out as it has cleared up the mystery of the cake stand construction for me!
I haven’t had time to make a second one yet. They do take a while, but if you like construction projects it is, honestly, great fun, and the end result is pretty darn fab. I know plenty of people who would love to receive one of these, and the images won’t just be restricted to shop fronts either, as the die cuts can easily be used for other projects. Would I recommend the product? Absolutely, definitely, yes. Do I want all the other shops they are teasing with? Absolutely, definitely, yes! Will I leave you with one more picture? Why not!

Supplies: Tattered Lace Retail Therapy Store and Retail Therapy Patisserie dies and CD-ROM; strong white card, glue and red liner tape
