Best of three…

Well, ‘best’ three times over really!

Banners, pennants, bunting, anything flag-y really, just floats my boat. Always has. Even that rather sad, dusty bunting that is brought out for shows and sales in musty church halls, still makes me smile. I guess the phrase ‘put out the flags’ is close to my happy place. Pull out a pennant, finagle a flag, bang out some bunting and you get my vote.

So, three cards, made with the same stamp and die set. Again, clean and simple in design, but I think the product suits the style. Hopefully!

One general thank you:

best of three 1

Another a bit more girlie:

best of three 2

The final one was meant to be more gender neutral. But I couldn’t resist a few sequins! Tsk!

best of three 3

Supplies: Concord & 9th Best Banners stamps and dies; Crafter’s Companion Elegant Snowfall embossing folder; Altenew Coral Berry ink; Hunkydory Adorable Scorable card in Pashmina (the pink); Create and Craft gold linen effect card


Put that reindeer down!

It’s official. I am obsessed with reindeer imagery. I had a lightbulb moment of realisation recently. You know the kind of thing, when you look at your wardrobe and suddenly notice that almost everything is black, or white, or pink (insert your colour here). So many of the cards I have made for Christmas this year feature reindeer in one form or another. And the thing is, I have more reindeer stuff I haven’t even used! Maybe there is a term for this condition. For my dignity and self-respect I hope it isn’t simply ‘fruit loop’.

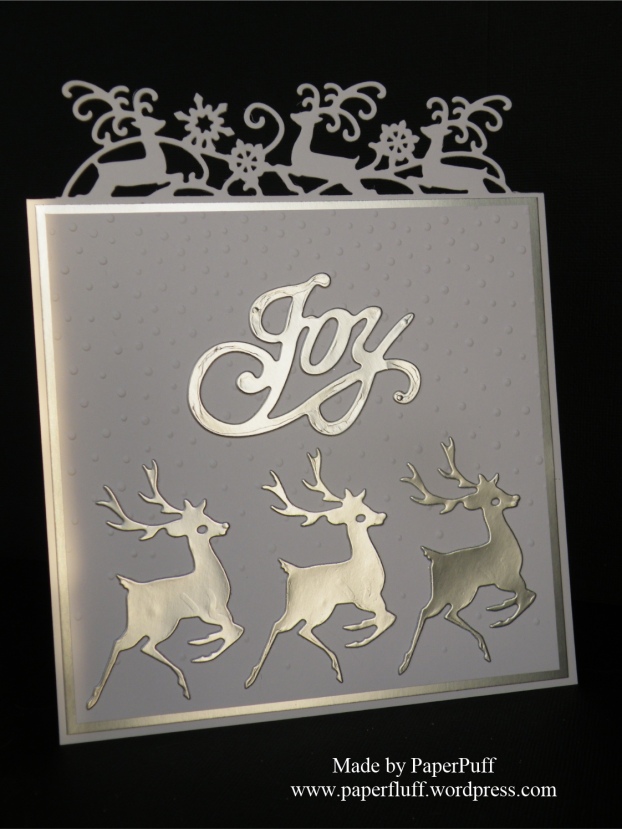
Anyhow, just a quick post today as I am still feeling a bit queasy. Luckily you can’t catch this sort of virus online. So, another reindeer card. Sorry! Hope there are no reindeer-phobics out there. This card isn’t actually radioactive as the look would suggest. Just silver, with winter sun catching on it. I quite like the incandescent look though!

reindeer-header-1

This was made using a Die’sire header die that I either bought last year or was maybe a freebie with a magazine, I can’t actually remember which. I can’t find the packaging and I am not sure if it is still available, but I think they do something similar anyway. I also used the Crafter’s Companion Elegant Snowfall embossing folder, plus Marianne reindeer and Anna Griffin Joy dies, again from old stash.


If you want to get ahead…

Get a hat!!

I have another two quick card designs to share today, both using the same hat image. I need to ramp up the production now that we are in November. Also so as not to cost a fortune for postage, a lot of the cards I make for me or my mother to send out need to be almost totally flat. In the UK, if your item is more than 5mm thick it incurs an extra postage charge. If you don’t realise this and just stick the envelope in the post box, the recipient has to pay or they don’t get the card! All I have for dimension here is a knot of ribbon, which just about keeps within the frankly miserly, very un-Christmassy stipulation. Now I think about it, I reckon there should be a surcharge amnesty for the run up to 25th December. And of course for every other holiday, religious or state, too. Or maybe ‘happy mail’ should be allowed to be any size, and only bills, junk mail and boring stuff should be subject to regulation? Much better idea!

Totally flat is tough for me, what with the addiction to 3D foam, but needs must. I am sticking with a minimal colour palette and a lot of white space. This time though the white space has been turned into snow using Crafter’s Companion Elegant Snowfall embossing folder for a bit of extra interest.

be-merry

For the first card I have used the Lawn Fawn Winter Big Scripty Words stamps and dies for the ‘be merry’ and a Taylored Expressions Santa’s Hat die.

For the second I used the same Santa Hat and a Tonic Dear Santa die. The hat band and pom pom are glittery but, guess what? Yep, doesn’t show in the photo!

dear-santa

I really wanted to add some jingle bells to the cards but made do with using them as photo props. I think I will make some more with all the bells (literally) and whistles (figuratively) on though, and to hell with the postage costs!

Supplies:

Lawn Fawn Winter Big Scripty Words stamps and dies; Crafter’s Companion Elegant Snowfall embossing folder; Taylored Expressions Santa Hat die; Tonic Dear Santa die; Create and Craft gold linen effect card; ribbons from The Ribbon Room


Who doesn’t like an elephant in wellies?

Especially when he is holding a bunch of balloons to boot (sorry, had to be done).

Am still in the Mojo Doldrums – a small group of islands populated by burnt-out crafters – so this time resorted to gift wrap to try and get me back up and running. Gift wrap seems less demanding, somehow, and its temporary nature takes the pressure off a bit. Nobody puts their gift wrap on show once they have opened the present, right? Others don’t look through the mantelpiece display and say ‘well that sticky tape is well positioned’ or ‘wow, look how sharp the corners are on that one’ do they?

So, a couple of milk carton boxes made with my Crafter’s Companion Sweet Treats score board. The boxes are really quick to cut and construct and then you just decorate as you wish. Normally I would love doing this, but today even gift wrap seems to be beyond me, so these are pretty basic. I have used gingham, for prettiness and Louise Tiler images from CraftArtist because they are lovely and I can resize them. The clip on the blue version was already patterned with a stripe, so no extra effort required. For the pink one I covered a plain silver clip in the same washi tape that I used as a border.

I wanted to embellish them a bit more, and make gift tags, but I just cannot settle on what to do. In a glass half full spirit I will call them work in progress.


2 bees it is!

This title will only make sense if you read yesterday’s post…

So I have my second bee card. Yesterday my poor wee brain couldn’t work out how to accomplish the finish at the bottom of the bee paper. I still struggled a bit today, and I’m sure there must bee (sorry!) an easier way of doing it. I wanted all my bees wandering off in different directions, so I decided the order and orientation for the hexagons, sticking all but the first one either up to or over the edge of the paper (so sometimes only gluing the top half of the shape); then positioning the first hexie in the line (no glue), cutting away the background paper enough to make sure it didn’t show and then sticking the hexagon in place. Clear? No, I expect not, because this is a lousy explanation and as I said, I probably made this three times harder than it should have been. Sometimes the light-bulb moment never happens and hard slog is the only way through.

Still, once this was done the rest was easy. A bit of spotty embossing at the bottom of the card – I considered the honeycomb pattern again but thought this time it was too busy for my bees (sorry, sorry)…I cut a second bee out – just the body and wings. Life is too short to spend time fussy cutting bees knees (sorry, sorry, sorry). Glamour Dust his wings, a bit of baker’s twine, a greeting and bulldog clip for what I hope is added rustic charm. Who knew you could buy rustic charm in the supermarket stationery aisle?!

bee 2 card

And because his lovely glittery wings don’t show up too well (it is dark as November here today)….

bee 2 detail

Bee paper and sentiment from Craftwork Cards Potting Shed 2; hexagon dies were free with the Crafter’s Companion magazine; base card is Hunkydory Adorable Scorable; bulldog clip from Sainsbury’s

2 bees, or not 2 bees…..

Well, only one ‘bees’ at the moment. As in a card featuring bees. The second card is buzzing around (sorry) in my head and is mid-construction, but I’m not sure that what I want to do is actually possible. Which means it goes onto the ‘when I have more time’ pile, or to that farm in the country…..

I have seen a few people embossing patterned paper and thought it looked pretty interesting, and this bee print from Craftwork Cards seemed like a perfect match for my Crafter’s Companion honeycomb folder, alongside the FREE hexagonal dies I used a few weeks ago for my ‘Quilty as charged’ post.

It’s interesting, because embossing printed paper seems to change the texture in a way that embossing plain paper, well, doesn’t really! It feels softer, more pliable. If you remember ever coming across those small leaves of face powder that had been transferred in a really thin layer onto a matchbook size sheet of paper (probably in the 1950s), to deal with the dreaded shiny nose, it feels a bit like that!

Other than that, I have added wellies, a watering can and greeting and a bit of baker’s twine. A totally flat and very easy card.

CWC potting shed bees and wellies card


Here’s a bit of detail, should you be keen for a close-up!

CWC potting shed bees and wellies detail


Cat + BBC = birdbrain

This morning, as usual before work the TV is switched on for BBC Breakfast news. I’d like to say it is so I can keep abreast of current affairs, sharpen my intellect and develop informed opinions on all the topics of the day. And of course (!) it is but it is also in case there are any road works, failed traffic lights (or phantom bus stops) that will affect my journey.  So, telly on, jump under the shower and….what the ‘bleep’ is that noise? TV volume is up to the maximum and now people three houses along can save electricity by turning off their TV and listen to mind instead.

I guess maybe the cat must have jumped/sat on the remote? But I’m not sure, and he is giving nothing away, sitting across the room and washing lazily. I remedy the situation, have a quick chuckle, scratch cat fondly on the head and get on. Local news coming up. Great. Except instead of a London accent the presenter clearly comes from Northern Ireland, and I am being told about bomb-making equipment being found near Larne. I am pretty sure Larne is nowhere around here. It sounds far too pretty. “Tee hee,” I think, “the BBC have made a mistake and everyone in the UK (or at least the South East) is getting the wrong local news!!” It switches back to the main presenters and nothing is said. THEY DON’T EVEN KNOW I think. Another chuckle.

30 minutes later the next local news bulletin is due. They announce it “now for the news where you are this morning” or something like that. But I appear to be transported, Dorothy-like, back to Northern Ireland again!  Shoddy workmanship by the BBC, I am thinking. Once, forgivable, but twice would get a ‘must try harder’ on their report.

Then, and only then, does my poor wee brain go, “hold on, wait just a second…did Riley (the cat) interfere with (sit on) more than one remote??”  Grab cable TV zapper, punch in the usual BBC One number and voila, I am back in South London. How did he do that??

Note to self: get caffeine inside you before all else. Otherwise you are an idiot!

So here, fittingly for today, we have a bird house, for my bird brain. I made this some time ago, and so as to  be honest and fair I need to say I think it was pretty much copied from an example or demo by the suppliers Crafter’s Companion. But sometimes if you are thinking about buying a product it is nice to see if it really works for us mortals!

This is from the Sweet Treats range and it was the first one I made. I used the embossing board and the accompanying CD for the flowery paper. Everything else was just scraps or stash. It does take a little while to do if you want to make the whole ’tiled’ roof effect but if you are in a hurry you could leave that out or maybe use dies cut strips to achieve the effect. I definitely wanted colour inside the box – it makes a massive difference to the end result. I know this because I printed one side only, got it all cut out, had a trial run holding it together and you could see that it lacked a bit of definition. So, print both sides of your card or do as I did and cut panels to glue inside. I really enjoyed making this box and they do have a bit of a wow factor!

Quilty as charged

I might need to take my temperature. Some strange delirium has taken hold. I’ve ditched the pastels and gone homespun. Brown and orange homespun to boot.

OK, what actually happened was that I was looking for something else (always am) and I came upon a paper pad I bought ages ago and had never opened. Which, as we know, is a crime against paper and the only way to make reparation is to use it, immediately.

I bought the Crafter’s Companion magazine a couple of weeks ago and had been waiting for inspiration to offer up an idea for the free hexagon dies that came with it. That moment had arrived. Rubbish timing because I wanted to do something else, but when life offers you hexagons, you make something tessellating. It’s the law.

I kept it pretty simple. No man’s land is a dangerous place after all and you need to get in and out again lickety-split.

hexagon honey

The papers are lovely, so it is nice to use them, even though it was only a 4cm square from each sheet! Using the die to cut a little window has worked well too. Next time I would put a greeting there. Or maybe use 3d foam to layer the whole panel onto another piece of card in the same colour as the base, with a scrap of another pattern recessed below the die cut negative space so you get different dimension going on.  (I raised the hexie with the flower image up on this card but the light for the photo was pretty bad so it is not too clear).

I expect normal pastels will be resumed again tomorrow!


Made with free stuff!

Imagine the joy. I am in a well-known high street stationer-cum-bookshop just to kill a little time before meeting friends for lunch and I find Altenew layered rose stamps and dies FREE, yes FREE with Simply Cards and Papercraft magazine (naming it so you can go get yours). I have some Altenew stamps already and have been trying to get accompanying dies but they seem to be rarer than hen’s teeth in the UK. So I had to purchase. It would have been rude not to. Just to give it a go, right? Who am I kidding. If the fire alarm had sounded I would have saved them before saving myself.

Today was my first chance to play. I have one I am happy with and think is finished.

freebie altenews blue

I tried to stick with the ‘free stuff’ theme as much as possible, so the wood grain embossing folder is one that came with a Crafter’s Companion magazine a while ago. The FREE (can’t help the capitals, still got the smile on my face) rose was stamped using Altenew inks. My stamping is still a bit rusty, but these inks seem to blend into each other over time; so, if you stamp with them and think it looks a bit harsh, give it a little while (pour tea, coffee, wine) and then look at it again. Chances are it will have mellowed quite a bit. Just my experience, anyway.

They also came with a diagram showing how to align them, which is really helpful. I have heard some people saying to work from the lightest to the darkest images and ink colours, and others saying they do the opposite. I have tried both and, for me, it depends on the image as to what I find works. This time round, I tried both and found it easier to do neither…

So, the set is a three layer image. Select your three inks, dark, medium and light. I still used the stamping guide, but started at image two in the sequence, in the medium shade. Then I layered the smallest stamp (image 3 in sequence), in the darkest colour over this and finished with the biggest stamp in the palest colour over the top.  So 2, 3, 1, basically. It just worked better for me, so if you have them and are struggling, it might be worth a try.

Card number two I think still needs a little something. Perhaps just be a greeting, maybe in a nice clean font?

freebie altenews red

Or ribbon tied at the top. Can’t decide. Both? Neither? What would Scarlett say? Tomorrow is another day…


If these cards were dogs….

….my mum would call them Heinz. For those too young to know what this means, a mongrel dog that was the result of generations of non-pedigree breeding was often referred to as a Heinz 57. Because Heinz made 57 varieties of soup, so the story goes, and the dog had about the same number of DNA contributors. Didn’t make the dog any less loveable though, right?

They are a bit more ‘random’ than I normally produce, with colours I don’t usually choose and brave (or misguided?) pattern mixing, plus some added textures. If paddling at the beach is my comfort zone, this is like swimming with great whites. With a paper cut.

I might go swimming more often! With plasters though….

In case you want to know:

Base cardstock from Hunkydory
Honeycomb embossing folder from Crafter’s Companion Embossalicious
Patterned papers from Louise Tiler (using Serif CraftArtist)
Circular greetings from Craftwork Cards
Butterfly die and embossing detail from Cuttlebug
Roses made with a Tonic mould and paper clay
Can’t remember where the miniature pegs came from!