Countdown to Easter: Eggsbox, but no games

Making a mountain out of mini eggs

Easter eggs are not just for kids, or at least not as far as I am concerned. I like to gift a few mini eggs to friends and family too. But handing over a rather dull net of chocolate is, well, a bit humdrum, so usually I try to gussie them up a bit.

In previous years I have made little ‘shopping bags’ and folded pouches but I thought it was time to try something different. This presentation is not 100% successful. It is a bit wobbly and needs to go into a flat bottom cello bag for transportation (as in to the recipient, not to a penal colony). Also I am not wild about the foil wrapping on the eggs. It is a bit busy for my tastes but that is how they come. The hard candy shell eggs would have been better visually, but obviously hygiene prohibits the use of unwrapped items. I don’t think anyone would like a mouthful of glitter along with their chocolate. Or indeed a little bit of Riley now that we are in moulting season!

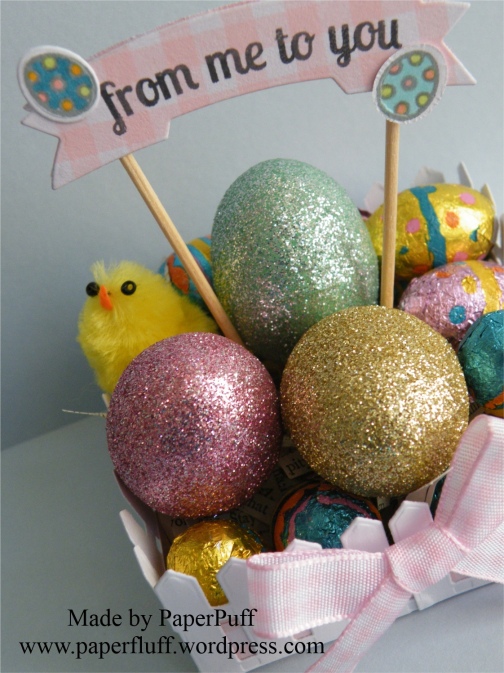
Still, the idea is ok, I think. I just made a quick box base from double sided gingham card and added a layer of with shredded paper. Shakespeare, in case the recipient should also fancy a jigsaw puzzle and some light reading. The outside is covered with multiple cuts of a picket fence die that was free with issue 144 of Papercraft Essentials magazine. Good free stuff!! Then I filled the box with some polystyrene eggs (from The Works) that had been covered in Martha Stewart glitter, one of my sadly deformed chicks and as many mini eggs as seemed feasible. Think of loading to the max a salad bowl, or a skip, whichever you can best identify with.

The final touch is a banner made with Clearly Besotted Mini Banners stamps and die. I cut the shape twice – once around the stamped image and once from plain gingham cardstock. I used red liner tape to fix an couple of cocktail sticks to the back of the stamped image and then 3D foam to cover the workings with the second die cut. A couple of Lawn Fawn Hoppy Easter eggs were hanging around so they got used too.

eggsbox1eggsbox3eggsbox2eggsbox4

Having stared at chocolate so much I am now off to eat some!


Countdown to Easter: make up your own joke about bunnies multiplying…

Firstly, an apology. I have been rather behind on replying to comments and checking out what everyone else is up to. I am, once again, having struggles with technology. From last weekend the internet has been on some kind of random strike action. It works fine for a while, then fades away. Comes back, fades away. Like some Gothic novel heroine, suffering an attack of the vapours.

I am also struggling with ongoing Reader and Notifications issues and then, because things always come in threes, I woke up with a swollen and painful eye, streaming nose and a banging headache. Peachy. I couldn’t see well enough to use WordPress for anything more than a few minutes at a time, nor could I get stuck in to anything creative. It has now improved significantly and I think it may have been an allergic reaction or a foreign body of some sort causing irritation (I have summarised enough medical records in my time to self-diagnose pretty accurately!!). I suspect it may have been glitter….

So, yesterday I was finally at least able to rustle up a little something, whilst squinting. This first card is made with Lawn Fawn Hoppy Easter stamps and dies and some Martha Stewart papers I have had for years. The tag die is from a set of three that was a magazine cover gift years ago and the cute row of crosses are made with Die-namics Basic Stitched Lines.

hoppy easter tag trio

The second card is more of a Heinz 57. I used the same Lawn Fawn bunny, scraps of the Martha Stewart papers and the free tag die again. The Easter egg and small bunny dies are another free gift, from Docrafts Creativity magazine recently. The embossing folder is from Teresa Collins and I think it is called Modern Stripe. I am on a mission to use up some of my doily mountain too. Gonna take a while…

hoppy easter bunny and eggs

Now have you every worried about your brain?! About some vital bit of rational thought just not occurring? Here is my recent example giving cause for concern. Feel free to laugh at or despair of me.

I bought this box of chicks on a whim a couple of weeks ago, because they were quirky and cheep (sorry) and I thought I might use them for photo props.

easter cards 012

At the point of purchase I wondered why they all sported Mohican haircuts. But then they do have specs and ties too so I guess my brain concluded that clearly anything goes. Perhaps it was some character franchise of which I was unaware? Or just the latest ‘thing’, maybe? Like loom beads, deely boppers, hula hoops, yo-yos….

Anyway, they have been sitting in their box on my workdesk and every day I have looked at them and mentally shook my head at the Mohican bit. Yesterday I decided that I would open the box and try and give one a haircut, take him back to the yellow only. Don’t get me wrong, I have no objection to a Mohican, but not on my chicks, I think.

And of course, as soon as I uncovered them and took one out, I realised my mistake. But for two weeks my brain has been fooling me and unquestioningly substituting a random hairdo for a (vaguely) appropriate anatomical feature. NOT a good sign!


Countdown to Easter: bunnies, Martha Stewart and Chopin

No, this is not one of those ‘if you could invite anyone from history to a dinner party’ conversations. Last week, on a whim, I bought a bag of polystyrene bunnies from The Works. At £1 for six little hoppers (well three large, three small, actually) it seemed rude not to.

I have a thing about 3D objects covered in glitter. It has to be good glitter though, so the colour is important – not ‘unwell urine yellow’ masquerading as gold. Years ago I bought a set of Martha Stewart glitters. Actually I liked them so much I then bought a second set in case they were discontinued or there was a worldwide glitter shortage. Luckily glitter hoarding is not a crime. I still have two practically full packs because a little goes a long way, but they are the BEST colours so I regret nothing. No wait, I regret shoulder pads…

I also have a thing for book pages or sheet music used in decorative items. So, a perfect opportunity to indulge both. It is healthier than chocolate. Amazingly I have never been tempted to lick glitter. Or sheet music.

So, to bunny number one. I decided to cover him in torn strips of the sheet music. I actually don’t think I have ever done this before with a complicated shape, but I had 6 bunnies to play with and plenty more in the shop if it went wrong. I mixed pva glue and water in approximately the usual 2:1 ratio and added some mica powder to colour it. I partly spread glue thinly on the bunny, partly doused the sheet music strips and just covered him as best I could, working the paper in to the creases with a firm brush. For sections like the side of his face and ears I found it easier to then tear another piece approximately the right shape and glue it over the top. He was set aside to dry a bit, then given another coat of the pva/mica for an extra glossy finish.

Bunny number two was glitter time! Again I have never covered a polystyrene shape like this before. I actually used the same tub of pva and mica because I had mixed up far too much. I thought the colour might taint the glitter a bit but there was no problem. The only difficulty was choosing what glitter to use, but eventually I plumped for Kunzite, a lovely dusty pink. If you have never covered shapes like this, just use a really, really thin layer of glue. You can always touch up any bald patches afterwards but if you put too much on you end up with dripping or sliding glue, and your bunny will have wrinkles prematurely. Might end up looking more like an Easter rhino or one of those pop-up ads for miracle face creams.

Now, I kind of wanted to add a bit more decoration to my bunny couple, but I am also of a ‘less is more’ tendency, so minimal accessorising was preferred. I made a tiny little crown/tiara thingie for Rosa, which of course elevated her status to Princess, and in the end just a simple bow for Mr Noteworthy. A woman should never be upstaged by her consort.

noteworthy and rosa


3D Thursday: Easter Pillow Boxes

Pillow boxes. An ‘in and out of fashion’ item, I think, for crafters. Actually I don’t know if they are in or out right now, but I do know I was for some reason possessed by all the devils of craft to make some this week.

I was also convinced that somewhere I had an one on an embossing board – crafters will know what I mean. A big slab of some science-y compound or resin or such, with grooves and channels to score the lines, to then be cut out.

A craft hunt! Hurrah! I NEVER do one of those, right?? So, donning crampons and grabbing belaying thingies I tackled the craft mountain. Like A-ha, I hunted high and low but could not find a scoring board. BUT, after a bit of pondering and some much needed Kendal Mint Cake I remembered an ancient purchase, back when the internet was in short trousers, of a bunch of Anna Griffin templates. Back to the north face! The templates had survived their spell in the wilderness and I could get going. Of course I could have downloaded one, or used my Cricut, but you know how it is when you get a bee in your bonnet. Oh, no, I have just reminded myself of the bridesmaid bonnets. On reflection I am quite surprised we weren’t attacked by a swarm of bees, actually, mistakenly thinking we were a good pollen source…

Anyhoo, back to the pillow boxes. I used quite a few things on these. The base is an old pad of Kanban card and the rabbit is from my Rabbit’s Tea Party digikit. The other bits and pieces are just from stash.

easter pillow box paireaster pillow box spottyeaster pillow box floral

I know the ribbon has fallen in a rather unfortunate place on this one – I only noticed after I had taken the photos!! I’ll go fix it…..


Countdown to Easter

Easter is a month away, which means it is time to break out the bunnies and scramble the eggs.

This is my first Easter offering. I say ‘first’ implying that there is a whole raft of projects lined up. That is not true. At the moment there is not even a ‘second’. I have though dug out all my seasonal supplies, and stared at them for a few hours. Not feeling it so far. Maybe inspiration will strike overnight. Does the Easter Bunny do house calls?

hoppy-easter-1hoppy-easter-2

Sorry about the state of the little chicks. I bought them either last year or maybe even before then, but never released them from the box. I think one or two were rather hastily put together, with little regard for realism, or indeed basic chick anatomy. But, I can’t resist them, so they had to get an outing or two. In fact I picked out some of the most oddball individual ones. Perfect is not always the best!

Supplies: Lawn Fawn Hoppy Easter stamps and dies; MFT Die-namics Basic Stitch Lines; Memento Tuxedo Black ink pad; Embossalicious A4 folder Picnic Plaid; Adorable Scorable card (yellow); various alcohol markers; glitter card from stash.


Easter is early, so I am late.

Fail to prepare, prepare to fail. Totally true, but who wants to hear it?? I think ‘flying by the seat of your pants’ sounds like so much more fun. Picture it, literally. Fun, right? Dangerous and possibly catastrophic but what a buzz!

Here is my paper folding equivalent, rustled up today. A small milk carton type box to house one familiar gold chocolate bunny and some mini Easter eggs. I could have fitted two bunnies in, but we all know that is not a good idea.

bunny box


Easter Treat Favours

These little pouches are very easy to make, even at the last minute. You just need some small plastic bags, which cost almost nothing (mine are self-seal but it’s not vital), strips of card or thick paper, ribbon or baker’s twine, double sided sticky tape, a hole punch and a small die, or you could use a punch. Mine are for mini eggs, hence the cavorting  bunny, but you could use hearts for valentines or weddings, stars or reindeer for Christmas etc.

Mini egg favours

Cut your strip of card about .5cm wider than your bag and twice the length, plus 3 cm. Confused? This is to allow a 2cm flap to fold over at the top and a little clearance at the bottom once you stick the bag in. All will become clear.

So my bags are 6cm wide and 7cm tall and my strip of card is 6.5cm wide & 17cm long. I score the long side at 2cm and 9.5cm and crease well on the score lines.

If you want a die cut window, now is the time to do it. Remember to cut it from the section between your two score lines, with the 2cm ‘flap’ at the top. If you are using punches, or the die cut rather than the negative, you can stick it on now too, or later if you wish/forget.

Stick a narrow strip of double-sided tape on the inside of the same (front) section, close to the 2cm score line. Use a strip a bit smaller than your plastic bag. Stick the top of the bag to this. Fold up the bottom or back section, and fold the flap over to cover it at the top.

Punch holes in the top, making sure they are within your 2cm flap. Wide apart or close together, big or small, depending on your choice of closure. I like the sweetie bow look, which for these took about 23cm of ribbon, with a little wiggle room for trimming afterwards.

Do it in stages and they are very quick. They look really nice in a mix of cheery patterns and embossed card in spring colours. This year I went gingham crazy but anything works and if I had more time I would dilute the gingham a bit! Always last minute…