Fully loaded!

Why time spent watching YouTube is never wasted….

Without even trying, I somehow came across a video of a loaded pocket (I think they are also called loaded envelopes). I had never heard of these before so obviously had to check it out. Whoa! Why has the universe kept these from me up until now?! I watched a second video, then I got stuck in. If anyone else has been similarly unaware, they are basically made with either a gift bag, or a US style lunch bag. You add extra pockets and then load them up with goodies.

loaded pocket 1loaded pocket 2

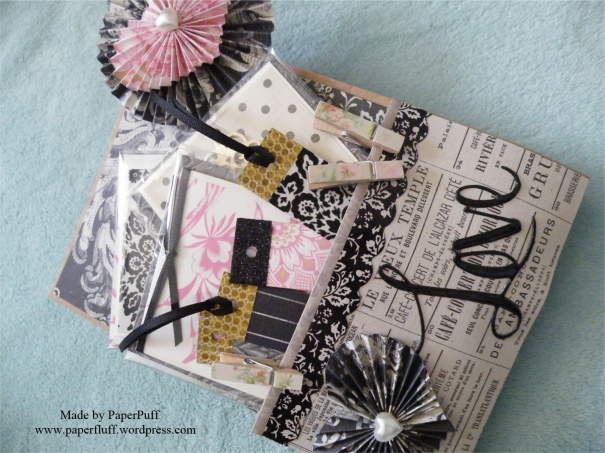
This one is for my sister and contains bits and pieces I either know she needs, or can use, plus a bit of fun too. I chose a paper pad that I have had for years but will be to her taste, and added in a bit of Anna Griffin. I made a few quick note cards and then the envelopes from patterned paper, plus some circular seals. Also some slim gift tags as she often makes jewellery for her friends. The mini pegs were easy to cover with scraps of paper, and the fridge magnets are punched circles of more paper scraps glued into bottle caps and then a dome sticker over the top. I put a double layer of magnetic tape on the back as the grab was a bit feeble! I think they are still more decorative than useful but what the heck.

This slideshow requires JavaScript.

I made the rosette thingie (sorry, I have no clue what it is actually called) with an embossing board that came free with a magazine recently. Its purpose is purely decorative and I think it was a bit of a waste of time to be honest. I had no instructions, so winged it to make the support stick. A straw was the right thickness but too weak, so I strengthened it by gluing a kebab stick inside before covering it with paper and fastening to the header piece. All a bit of a faff, really.

Also going in are some craft items, but there is no need to take pictures of them, and a big bar of chocolate. Just because.

You can get a LOT of stuff into one of these and making it and the various elements was fun. It could easily be used to give different small gifts – maybe pampering goodies, flower or vegetable seeds, stationery, herbs and spices or cake decorating supplies. Anything really. And again, the best bit is the feel of the stuffed pocket and the rustling noise. Heaven!


Countdown to Easter: Eggsbox, but no games

Making a mountain out of mini eggs

Easter eggs are not just for kids, or at least not as far as I am concerned. I like to gift a few mini eggs to friends and family too. But handing over a rather dull net of chocolate is, well, a bit humdrum, so usually I try to gussie them up a bit.

In previous years I have made little ‘shopping bags’ and folded pouches but I thought it was time to try something different. This presentation is not 100% successful. It is a bit wobbly and needs to go into a flat bottom cello bag for transportation (as in to the recipient, not to a penal colony). Also I am not wild about the foil wrapping on the eggs. It is a bit busy for my tastes but that is how they come. The hard candy shell eggs would have been better visually, but obviously hygiene prohibits the use of unwrapped items. I don’t think anyone would like a mouthful of glitter along with their chocolate. Or indeed a little bit of Riley now that we are in moulting season!

Still, the idea is ok, I think. I just made a quick box base from double sided gingham card and added a layer of with shredded paper. Shakespeare, in case the recipient should also fancy a jigsaw puzzle and some light reading. The outside is covered with multiple cuts of a picket fence die that was free with issue 144 of Papercraft Essentials magazine. Good free stuff!! Then I filled the box with some polystyrene eggs (from The Works) that had been covered in Martha Stewart glitter, one of my sadly deformed chicks and as many mini eggs as seemed feasible. Think of loading to the max a salad bowl, or a skip, whichever you can best identify with.

The final touch is a banner made with Clearly Besotted Mini Banners stamps and die. I cut the shape twice – once around the stamped image and once from plain gingham cardstock. I used red liner tape to fix an couple of cocktail sticks to the back of the stamped image and then 3D foam to cover the workings with the second die cut. A couple of Lawn Fawn Hoppy Easter eggs were hanging around so they got used too.

eggsbox1eggsbox3eggsbox2eggsbox4

Having stared at chocolate so much I am now off to eat some!


Lickety Split: If I were a dinosaur, I would be a velocowrappter….

Gift wrapping seems to give so many people stress, and at this time of year it is like immersion therapy for the daunted. I will happily hold my hand up to being a gift wrap nerd. I love to wrap a present, to make it look pretty, or fun, or glamorous or just different. But I am not one of those who can tie an immaculate bow, and I dont use the most expensive gift wrap, just whatever the high street stores have to offer.  The gifts don’t have to be perfect, or ‘shop style’ or works of art. ‘Pretty’ will do fine! Dont get me wrong, if I could spend bazillions on wrappy stuff it would ABSOLUTELY happen. I once heard that the Spelling family (of TV and/or movie fame) had a gift wrap room in their house. I swear I have never in the whole of my life wanted to be someone else more than I did right then. But now I have a craft room and maybe that is better!

Gift wrap is my spiritual home as a crafter. However, I have been told so often by people that they struggle with it. I can’t think how many times someone has handed me a gift and apologised about the wrapping. Well, they should NEVER feel they have to apologise. It IS the thought that counts and a person shouldn’t feel pressurised into striving for some kind of perfect presentation. Realistic and achievable will do nicely, if someone wants to give it a go. But if is just not in their skill set, who really cares?! Not me, for sure.

But, if you are despondently soaking your paper cuts in antiseptic before taking another deep breath, maybe also a fortifying swig of mulled wine before getting back in there amongst the paper rolls and curling ribbon, here is a little something that might help.

The PaperPuff Pockety Pouchy Thing. Yes indeed. So maybe the name needs a little tweaking. Bear with. Imagine you have some little presents for the girls at work. Maybe some hand cream tubes and a nail colour, or body lotion in a squeezy bottle, that kind of thing. Or male grooming products. All lovely gifts, but a struggle to wrap. Now this won’t be pristine angles and hospital corners, but it is easy, it works, and it looks fine and dandy. Plus, it takes just a few minutes.

Lock and load.

This slideshow requires JavaScript.

So, now there are plenty of options to close it up. You can:

Cut the edge with fancy scissors (or you could have die cut the edge at an earlier stage if you wanted), cut or punch several holes, or just two holes, and thread some ribbon through, or even a strip of paper

Use pretty pegs or clips to fasten it

Here I have just done the simplest thing. I folded the top open edge over twice to the back (neat edges = happy) and then knotted some organza ribbon around it.

This really takes just a few minutes and then you can add whatever embellishments you fancy! I like tiny baubles/ornaments, jingle bells, candy canes or chocolate coins, or sometimes a bit of real evergreen and a pine cone.

wrapping-final

Sorry some of the pictures are a bit blurry. I think my eyes need polishing. The basic idea is just to create your U shape and don’t worry about the height of it: it can be shallow or tall, and longer on one side than the other is also fine! I only wrapped one item here, but you can wrap several things together and you can always secure them to the card with a bit of sticky tack, or tape if it makes it easier for you.  This isn’t meant to win us any competitions, after all, just get us through Christmas!

Hope everyone is having fun, or at least surviving anyway!


3D Thursday: on a Friday. Because thinking can be dangerous.

Yes, I am a day late with this post. May the gods of Blogland forgive me. Apparently there are one or two other things going on at this time of year….

Christmas cards are finally finished (hurrah!!), including some last minute ones for my sister. I was happy to make them for her, until there was another cat-and-die related incident. As I was cutting out 60 individual fairy lights with the smallest die known to man (1cm x 1.5cm, and a tiny part of a much larger set) I randomly thought ’How awful would it be if I lost this die? I wonder do craft companies ever let you buy replacements for individual dies? If not, they really should….’. Then the cat decided to jump up on my desk, at the opposite end to where I was working. Normally this is fine, but this one time he got the maths wrong and launched himself and several small ink pads I was using onto the floor. In my haste to make sure no inks opened and stained the carpet, and that the cat was ok (only his dignity was ruffled) somehow I lost the tiny, tiny bulb die. And spent TWO HOURS looking for it. Eventually I found it of course, several feet away from where I had been, in a box of cards that were finished and ready to go. I really should learn to think less, because the consequences can be dire.

So, my schedule was thrown out a bit. But, as I was clearing my workspace up I decided to use some of the card making leftovers to make bottle tags, rather than just throw them away. It is probably a crime against glitter paper to send it straight to recycling without ever being given its moment reflected in the twinkle of a Christmas light.

xmas-bottle-tags-trio

These are the same measurements as I used for the male bottle tags I posted before. So. 6cm wide, 21 cm long (which is the width of A4 card); score at 6cm from the top and die cut or punch a hole in the 6cm square you have made with your fold line. Super simple. I ran a couple of them through an embossing folder and cut a pennant shape at the bottom. Then just chuck on anything you have carefully select your embellishments and sentiments, a bit of the sticky stuff and you have busted some scraps in no time at all.

xmas-bottle-tag-santaxmas-bottle-tag-goldxmas-bottle-tag-reindeer

Cheers! I could do with opening that fizzy stuff right now!


3D Thursday: not Teas-day then?

Gift wrapping is an obsession for me. Not to the extent it used to be before I got into paper crafting, but still, any present I am giving has to look good or I, and it, cannot leave the house. I don’t always go to these lengths for every gift, but I do like to have a small stash of interesting and/or pretty bags, boxes or other containers on hand. Things that will hold a couple of those hand creams that look like tubes of paint, maybe a pot or two of nail colour or some makeup. Or even tea, come to think of it! Things that are a pain to wrap, or seem more like a pampering gift if they are presented together.

This tea cup was made using my new-ish Cricut. I still haven’t played with it all that much so I’ll do a mini review some other time, but as I had the Tags, Bags, Boxes & More 2 cartridge I figured I would browse through that for a suitable 3D project. This cartridge is jam-packed with exactly what it says – boxes, bags and tags, and I chose the tea cup.

There were a couple of teething problems (and three wasted sheets of good cardstock) before I got the cutting achieved. I will say here and now that I did not help this situation. I don’t have things set out very well at the moment: you need to use your pc/laptop with the Cricut Explore and currently my Cricut is positioned behind my desktop screen, so I keep having to walk between the two to follow the steps. Once I sort this out I expect it will go a lot more smoothly! Another issue was that this image required use of a scoring tool first, but I couldn’t actually see that mentioned on the screen anywhere. I may have missed it in all the wandering about of course. Anyway eventually I worked it out and I got what, I have to say, is a great cut, and in my opinion much better than I achieved on my old Cricut. Cue the happy dance.

Construction is pretty obvious, although you have two different sized circles and had to work out which was for the cup base and which for the saucer. The physical cartridge came with an assembly guide, and again I couldn’t see this on my screen anywhere, but I am sure you can get help with the more complicated shapes from Cricut’s site or YouTube if you need it. For my plain white test run version (should really have done this first rather than waste pretty card) I used the large circle for the saucer and smaller for the tea cup, but it should have been the other way around. Obvious, really, but there you go…

When I felt I knew what I was doing I moved on to a spotty Tim Holtz paper. It was a bit of a struggle to get the larger circle to fit the tea cup properly and in the end I just stuck it on and trimmed it down once dry. This worked fine and has given a neat finish so no worries.

Now for some decoration. I have cut into some doilies and snipped out the centre circle to give me a curly strip. This is stuck to the inside of the cup and underside of the saucer using double sided tape, pleating it as I go to make a frill. This also helps to ease it in and cover up where you join the next strip.

If I had more time I might have added flowers or something, but the deadline is upon me and 3D Thursday cannot run over to Friday. It’s the law. I made do with a little tea cup shaped tag I cut from the reverse of the Tim Holtz paper with a Spellbinders nesting die set.

Typically the only tissue paper I could find was spotty red, but actually I like the contrast. Sorry it is a bit wrinkled but I don’t crave blogging photographic perfection enough to get the iron out.

These are great for favours, or a shower, or work colleagues for Christmas, and they look really cute if you make lots in different colours and patterns and pile them together. Cellophane or large cello bags (the kind we put cards into) are also really handy if you want to have them all enclosed but still want to show them off. And of course you don’t need a cutting machine to make paper or card tea cups, there are plenty of templates available.