Please, don’t eat the daisies!

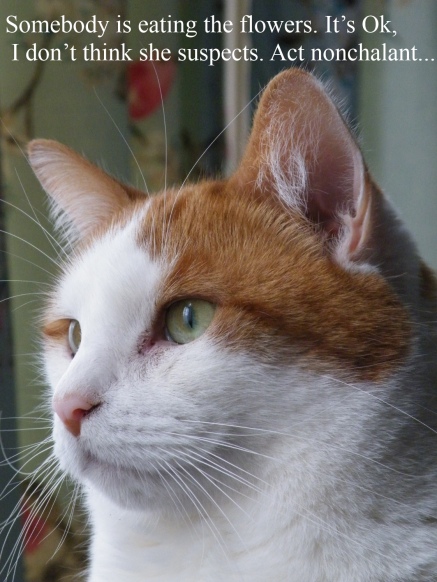
The title of a Doris Day film. Also, a sentence oft spoken in our home this week, in a slightly different way. As in no ‘please’ and no ‘daisies’. More like ‘Stop eating the flowers!’ or just ‘stopitstopitstopit’ whilst wresting the paper pulp from the cat’s jaws. Don’t get me wrong, it is nice that he involves himself with my hobby, but eating the hobby is not the way to go.

daisy-eating-riley

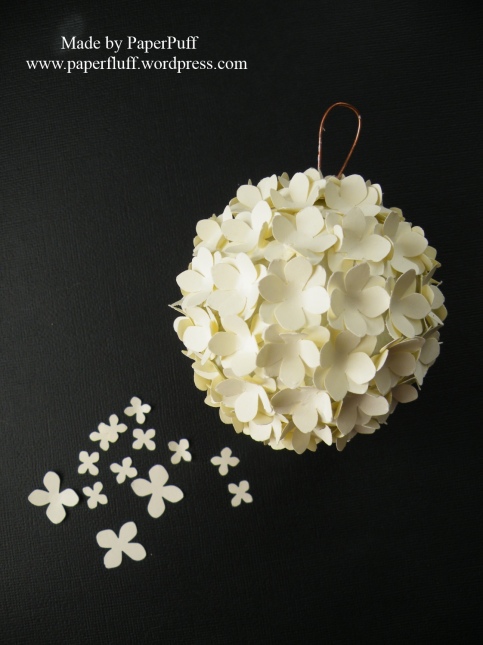
This is a WIP. My sister made some bare naked Christmas baubles (UK English) or ornaments (USA English. Hmmn, don’t know where Canada sits on this one?) to decorate. We thought it would be fun, given we both have quite large and very different stashes and quite divergent crafty leanings. I collected my orbs a few weeks ago but haven’t done much so far. I know I need to be more Christmas orientated but I think that is where I fall down. I really cannot get in the festive mood this early. But I had a naked ornament to decorate. Fun, right? I have never done this before. The base is a kid’s plastic ball, a wire hanger added and then covered in a textured papier mache layer.

Now to get going! I’m not certain where this particular bauble or ornament will end up, but it is a start. So with the ’not yet’ feeling in mind I deliberately travelled the ‘not Christmas’ road with my first effort, and started by punching many, many paper flowers to cover it with. In fact each flower you can see is two layers, offset a bit. I am not sure how many it took. I started making a circle around the middle, which took 16 whole ‘flowers’ for a bauble measuring about 6-7cm diameter. I had hoped I would just eyeball it and get a beautiful encirclement to meet up in the middle, without actually mapping or drawing it out. Fail to plan, plan to fail, came to mind as my circle was so ‘off’ by the time I had made it around the circumference once that one end was clearly heading north without a backward glance. To visit Santa, presumably. But actually it didn’t matter. Maybe I was lucky, but I just kept going and managed to cover it all without any odd gaps or some being more closely squashed together than others.

flower-bauble-1

I think I am going to finish it off with a gentle dusting of glitter and some pearls here and there. I may also cover the wire with ribbon or tissue paper. If anyone has any good ideas feel free to stick them in a comment – I have plenty more baubles!

Supplies (possibly the shortest list ever): a Martha Stewart punch. It hasn’t got a name on it and I bought it so long ago I can’t remember!


Tiny Prancer

This one is for you, Elton! I’m sure he reads this. Along with the IOC President of course – I got them all!!! Anyway, another eminently batchable (is that a word? ‘tis now) Christmas card. Although the background is annoying me a bit and needs tweaking. I really, really want a nice falling snow embossing folder but have not managed to lay my hands on one. I tried a couple of symmetrical folders (swiss dot and a triple cluster of dots) but they were too busy, too ‘all over’. I also experimented with another which has a snowy village scene and a lot of sky with a few tasteful tiny frozen flakes, but the cottages showed at the sides of the reindeer bit. It made it look like I had some kind of Lapland version of Godzilla laying waste to Santa’s workshop. So that was a ‘no’ then.

sb-reindeer-card

I decided to leave the background blank, put everything else together and stuck it on, then decided NOT to leave the background blank. Go figure. I thought I would try embossing a small scattering of dots, meant to charmingly represent snow. But the card I had chosen was too thick to be able to see through to use a brass embossing plate in the usual way. I had what I then thought was a totally genius idea: deboss on the front so I can see where I am going, then flip it over and push it back out from the other side, to make an emboss! Einstein level, right? Worked a treat in practice, but of course I was practising on a bit of scrap card. The reality of doing it on the otherwise finished article, with everything else already stuck on, meant that I was a bit over-cautious about pushing too firmly with the embossing tool. So the ‘snow’ barely shows up on the inside. I wasn’t going to risk it. It could have ended up looking like my snow had sneezed. So it is how it is, but may change slightly for next time! As I type this it occurs to me that maybe I should have tried freehand embossing. I don’t freehand anything as a rule, but it might work for this.

I used Spellbinders Ovals and Scallop Ovals, and a Spellbinders Reindeer die, all of which I have had for a few years. The greeting is by Clearly Besotted, and the uber-sparkly (where is my umlaut? People? People? I need an umlaut here..) ribbon from Docrafts.

If Elton wants me to make his Christmas cards he knows where to find me.


How do you do it?

Blogwise, how do you roll?

How do you plan your posts? Do you schedule well in advance and have it all written and ready to go?

Do you have an outline plan, to which you add detail as you get close to posting?

Do you post on set days?

And, seeing as we are on the subject, do you set your posts to publish ahead of time?

Or, do you think, write, post as the mood takes you?

So, I’ll go first. That’s a given, right?

Generally, almost everything I post here is spontaneous, off the cuff, however you want to call it. I very rarely have any cards made in advance, or even planned, so if I want to post I have to make something in the evening after work, then the following day take a photo or two, think of a title, write the post and publish. Plus go have a look at what everyone else is doing (in fact I usually do this before posting myself). It can take a lot of time. Don’t get me wrong – I am not complaining. This is a voluntary undertaking and I am having a ball. I also love to visit other blogs and check in with my bloggy pals. It’s the whole flipping point of this after all! But I do wonder if I could do it better?

However, this is one post I did actually plan a bit in advance, mainly because I am really, really interested in knowing how everyone else goes about the task. If you are someone who has to ‘make first, post second‘, how do you do it? How do you make it work? I know some people post WIP, and if you garden, grow, draw, paint, knit, sew, crochet or stitch this makes absolute sense, because your projects can take weeks or months to complete. But if like me your end product is a relatively quick thing, but you also work, have a household, a social life etc etc, well I can‘t help thinking that I should be more organised. Or is the answer just to post less?

Sometimes I have an idea in advance, and then I can plan better, and write something (which I generally change radically anyway), but not often. Usually I sit down, and think hmmmnnn….for quite a while…..

Thing is, this is so against my nature! I am someone whose comfort zone is firmly in the ’be prepared’ department; I am the woman who sends emails to the boss explaining everything I have done and covering every possible scenario when I am away from work for a week. Flying by the seat of my pants would definitely require a sick bag. I have no idea why I am ok to abandon all my natural tendencies when it comes to blogging. Maybe it is just time pressure.

I would love to have nice posts, all neatly lined up and ready to go, like little glittery packages sitting, waiting to be picked up by virtual carrier pigeons. Maybe one day! In the meantime, here’s a quick card, and yes, I had to rustle it up before I could post this!!

cb-elliecb-ellie-detail

Supplies: Clearly Besotted Baby Shower and Mini Basic Banners stamps and dies; Lawn Fawn ink in Hippo


At last, something repeatable!

Not, I am sure, what some people might be thinking…although as a kid, I was a blabbermouth. My older sister would furtively tell me a ‘rude’ joke when we were alone, swear me to secrecy, probably with warnings of dire consequences if I transgressed. I’d just nod, agree to anything, happy to have a bit of a secret, or maybe ammo.

The priest used to occasionally do his rounds on a Sunday afternoon, presumably as a single man in search of cake, although I do remember seeing the odd bottle of beer in his pockets too. Apparently, with an audience of good folk gathered, I considered this to be prime joke telling time. I was still pre-school, but was ’blessed’ with a really good memory and repeated the rude jokes pretty much word for word. I say blessed, but I am not sure that is the adjective that sprang to mind for my poor parents. I probably mistook the silence for awe.

I digress. Here we have a Christmas card which is most definitely repeatable and suitable for a batch making. Hurrah! I used three sets of Altenew stamps and three colours of Altenew Warm Grays (sorry for the spelling, UK, but it is how it is!). Almost every year I have an inclination to make Christmas cards with a white, grey and red colour theme. But it is so ridiculously difficult to find the grey I want – a warm charcoal – that I give up. This year? Still can’t find it. But I did bag a bargain pack of Lynda Chapman silver mirror board a few months ago, specifically with Christmas and the fruitless search for the perfect grey in mind. I thought it would be a good replacement. It is much paler of course, and shinier too, obviously, but has a lovely satin finish and is sturdy enough to be the base card. It also die cuts and embosses really well too so I am very happy with my purchase.

snowy-cottage

The Winter Cottage is stamped in Altenew Moon Rock, the sentiment in Lava Rock (a shade darker). For the Snowing image I had a bit of a dilemma, as stamping white snow onto white card is clearly a flawed plan. I thought I would try a pale grey, obviously running the risk that it would look more like a snow scene from the M6 motorway than an idyllic pastoral vista. I used Morning Frost, which, it turns out, is practically invisible. The stamp itself is rectangular, and whilst I am no geography expert (I thought Carlisle was in Scotland and the Trossachs were some kind of athletic support) I am pretty confident that snow doesn’t fall in rectangles. So, I cut a rough arc or oval shape wider than the card and laid it over the snowy cottage to give me a gently curved mask and then stamped my snow around. Actually I was very pleased with the result! This is the third batch of photos I have taken, trying to get the snow to show up. It is marginally more visible in real life, but I did a close-up, just to prove its existence!

snow

There IS glitter on the cottage roof and here and there on the snow, but as usual, it is camera shy. A knot of red grosgrain ribbon from last year’s wrapping stash and we are good to go.


Supplies: Altenew Winter Cottage, Snowing and Pine Tree (for the sentiment) stamps; Altenew Warm Gray 4 ink cube set.


Is it snowing upside down?

A fourth Christmas card. At this rate I will be ready by about Boxing Day 2018. I’m going to have to get a wriggle on. Like most, I do struggle to deal with Christmas so early, but if I don’t speed up family and friends will be getting shop-bought (again).

What I should be doing is coming up with a few simple but (hopefully) classy designs that I can easily batch make, but that in an ideal world will make the onlooker gasp in wonder. What are the chances of that happening? Fat chance? Slim chance? Why do those both mean practically the same thing, when fat and slim are polar opposites?

Anyhoo, back to the point. So I should be trying to make something simple but stunning. Instead I decided to create a pull tab slider card. Go figure. I haven’t made any kind of slider since Methuselah was in short trousers, and then only a penny slider which is MUCH easier. I contemplated the penny slider here but if you are not a card maker and still reading this (thanks, and well done!) a penny slider makes the object roll in a circle rather than slide in a straight line. Meaning my little car would be involved in some horrific road accident. Not ideal. So I did a bit of YouTube swotting up and then got stuck in.

lf-car-sliderlf-car-slider-pulled

I used a whole mish-mash of products for this. The snow die (love it, love it, love it) is from Avery Elle. It cleverly cuts the holes to be the snowflakes. Genius. I will be using this a lot!

The houses, car and tree are Lawn Fawn, and so is the sentiment. The diagonal stripe is from Clearly Besotted. I was brave (foolhardy?) and used some alcohol markers to colour the car, although I did seriously contemplate paper-piecing instead. You will notice there are no close-up shots!

I didn’t have a rectangle die long and wide enough to make my slider gap, so I just used a shorter one and extended it by fitting one end back into the cut space and the other over the card surface again, then ran it back through the machine to cut to the right length.

There was a fair bit of faffing around with this, but no actual mess-ups. Except I am not sure if the snow is upside down or not? Aw, who cares!

Supplies:

Lawn Fawn Home for the Holidays stamps and dies and Little Town border die; Avery Elle Falling Snow die; Clearly Besotted Diagonal Stripes stamps


Christmas card productivity increase of 200%!!

Sound impressive, right? Statistics can be misleading. Yes, I have increased my productivity by 200%. Maybe it might be 300%, I can never work these things out. I tried googling it and came out the other side only more confused and desperately in need of refreshment. If only I had a blogger friend who loves maths…(you know who you are, feel free to step in any time!). But the point is, I had ONE Christmas card, and now I have three. So the stats are impressive, but the basic numbers are rubbish!!

lf-scripty-pair

Anyway, these simple little cards were really fun to make. The two-stamp process for the fairy lights looked like it had major potential for disaster, especially as they are really, really tiny, but it works like a dream. Not one single one went wrong. Hurrah! Then the stamps and dies worked amazingly well together too: lining up the die over the fine line word stamp was really simple and it felt like some thought had gone into making this easy for us to do. Plus, I love them!! Can’t wait to try these out a bit more.

lf-scripty-whitelf-scripty-red

As usual I tried out baker’s twine, ribbon, even a jingle bell or two as a bit of extra embellishment, but rejected them all in favour of total minimalism. I got these little easels at The Works. How cool are they?! And they really are tiny – the cards are under 10cm square.

Supplies: Lawn Fawn Winter Big Scripty Words stamps and dies; Altenew inks: Teresa Collins Modern Stripe embossing folder; cards from my stash.


Tickled? Well a bit of pink, anyway…

Whilst I have something out to make a card, I often figure I may as well make more than one. Give the product a bit of a workout. But without the lycra and the star jumps. So, three simple cards with one die set: MFT Die-namics Feathers & Arrows. I have been seeing a lot of pink and copper products and colour schemes and this tickled my fancy first. I used Brilliance Cosmic Copper ink and a really old embossing powder by Personal Impresssions called Copper Kettle. I dithered over straight or fuzzy line finish for the dipped feather and settled for fuzzy. If you deliberately choose imperfect then you are bound to get it right! The dotty feather is done with a stencil – the edges of the spots are a bit ragged but hey ho. I really like how this die creases down the centre, so you can easily get some dimension but they will still fold down flat for postage.

feathers-pink

Card number two appeals to my sense of humour. The patterned papers are from theTrimcraft Paradise Crush pad, and they feature feathers. So I have feathers cut from papers with feathers on them. Just me then? Ok, fair enough. I know it looks a bit like a dream catcher, which is totally unintentional because dream catchers are something I find quite ugly! But, this is just a bunch of feather-feathers, right? I drop-shadowed the sentiment a bit to help it stand out more from the background paper.

feathers-paradise-crush

The third one is super-quick. I sprayed the die cut feather with two shades of some ancient Cosmic Shimmer misters I had, then dipped the top in gold leaf paint. I had earlier tried embossing the top section of the feather in gold, but it looked a bit too muddy for my liking. Hence the dunking.

feathers-gold

Three cards. That increases my output this week to, hmmn, three….peachy…


Some technical hitches…

…and YAY definitely NOT me to blame this time! I think…

Is this happening to anyone else? I start to go through my Notifications. I see a comment so type my reply and hit send. Then I get that sad, slow circle that looks like it barely has the energy to complete itself…creeping…slowly progressing around and around…and finally a red box telling me my message has failed and to try again later.

I used to follow this instruction and wait a bit (although to be fair, probably not long enough) but the message would never send, and it seemed to struggle with a couple of fellow bloggers in particular. Now when this happens I just click into the other sites to reply, or reply via my posts.

I can live with this I guess. Maybe it is my pc? No, because it is not limited to only the pc. Maybe I am doing something wrong? Maybe it is just how it is sometimes?

But it happened to me again last night. I had quickly scanned through the Notifications, then typed the first reply, which would not send. Plan B (as described in great tactical detail above) to be implemented. A cold drink would surely help as the UK has turned into Bermuda for the last few days. Armed with something chilled I log back in. Some of the comments I just saw are no longer in the Notifications. Horror! Scroll up, down, up again just in case (I know, but hope springs eternal). Gone. Close down, go back in, still gone.

So now I am playing a version of that party game we ’enjoyed’ as kids. Where the mum uncovered a random selection of items on a dinner tray and you had a few seconds to memorise, wait a bit, then itemise. Time to deploy those skills!! See? Partying is not a waste of time after all.

Think hard, visualise the screen…who commented, who replied to my comments…and to which post… I remembered some, but have no clue if I remembered them all. This is not the first time comments or ‘likes’ have just not appeared in Notifications either. And I haven’t accidentally deleted any comments for a long time now. Really. I am a reformed blogger. Or at least a marginally more competent one.

So apologies if it looks like I have ignored you – it has not been deliberate. If someone is nice enough to make a comment or reply to mine, I always intend to respond in some way.

But also, is this just me? Does it happen to you? Can I fix it? Easily? Or shall I just jump up and down and go ‘waaaaaaaaaaaaaaaah’? Yep, not gonna lie, I feel a bit better for that!


Seaside surprise

I had a lovely visit to the coast last week to see my mum, sister and her partner. I was well fed (and watered!) and had the chance to walk on the beach and chat to the seagulls. What, just me? Ok then. There is always something going on, something interesting, different or fun to look at or to do there. On the Friday evening we heard cycle bells and we rushed to the window to see a whole straggling string of cyclists, young and not so young, wearing silver foil costumes to resemble a robot or the Wizard of Oz Tin Man, and with their bikes covered in fairy lights. Mad, but brilliant. Apparently it happens every week in September! Then a little while later a laser light show started on the pier. It was a beautiful warm night so we just went out for a walk along the promenade to enjoy it. There is a real holiday atmosphere there and I am so glad my mum has been able to move to such a lively, vibrant place.

When my sister and I get together the talk always turns crafty. In the nice way. I knew she would love the idea of paper bag books/albums, and I was not wrong! Now I will be sending her some bits and pieces to create one herself to showcase her art dolls. But in the chatting about the various ways they can be constructed, my mum produced a gift I made for her a couple of years ago. It hadn’t occurred to me until that minute that it was also a sort of paper bag album. I didn’t have my camera with me so these are taken in my sister’s kitchen on a mobile phone. And some prosecco had been consumed…I think this is why we forgot about December…

This slideshow requires JavaScript.

I made this following the instructions below from Clare Charvill at My Creative Spirit. This lady makes the most amazing projects.  It was the first time I had done anything like that, so I stuck pretty close to the tutorial I think. But then again if you are making the same object with the same materials I guess that is likely to happen! The paper pad for the inside is Graphic 45 A Place in Time and the outside sheet is Anna Griffin. I had to find something big enough as I only had a small pad of the G45 papers and this seemed to work nicely. The panel on the front is also Graphic 45 but I can’t remember which range – might be Secret Garden. I didn’t have any of the bags then so made my own pockets from brown parcel paper. Every page has got a top-loading pocket with a pull tab, but as they are filled with names and dates we didn’t think we should photograph them!

It took a while to make, but the instructions were clear and I don’t remember anything going wrong. It was enjoyable, I was pretty darn pleased with the end result and my mum loves it.


One of us has got a new toy

I thought it was me, but now I am not so sure. You know how it is. You get your new toy out and the cat immediately takes possession of the box.

riley-cricut

That is what I thought happened when my Cricut Explore arrived this week, but then I remembered….

The pc (one of the earlier touch screen models) is now a bit old and starting to creak at the seams. When it was box fresh it had us baffled for a while. You would walk into the room and see your taskbar had mysteriously moved to the side of the screen, or been hidden, a different program was now running, or everything was in a font size big enough to be seen from space. For a day or two it looked like it was going to be returned as faulty. Then the culprit was found. Caught in the act.

riley-solitaire

He had a fascination for the thing, and kept batting at the screen with his paws or swooshing it with his tail, causing all sorts of mayhem then wandering off so you had no idea he had done it. It almost became like a scene from ‘Cats and Dogs’.

So maybe he thinks the Cricut is for him, and I am going to be left with the box. I better go stake my claim and make something pretty quick….