When the caffeine is taken away…

Yesterday I had zero caffeine. By choice, not some horrible deprivation torture inflicted by a heartless monger of alternative hot drinks. I don’t drink much – usually just one or two mugs in the morning and that is it. Rarely past noon (that is 12PM lunchtime in the afternoon to some TV presenters) as I am a serial rubbish sleeper so why throw another obstacle into the mix? But last night despite being a caffeine free zone I just couldn’t nod off and eventually got up and made a card. And, well, as you can see, I was perhaps a little preoccupied…

Coffee cardcoffee card detail

I wonder what was on my mind?!

I wanted to use some coffee beans in the photo but there are none in the house. A pile of instant coffee is not too appealing. Galaxy Counters are as close as I could get! It’s OK, they have already gone to a good home…

Supplies: Clearly Besotted Warm Wishes stamps and dies; Altenew Coffee Talk stamps; Hunkydory Adorable Scorable spotty and striped card; The Works stitched rectangle nesting dies


Countdown to Easter: Eggsbox, but no games

Making a mountain out of mini eggs

Easter eggs are not just for kids, or at least not as far as I am concerned. I like to gift a few mini eggs to friends and family too. But handing over a rather dull net of chocolate is, well, a bit humdrum, so usually I try to gussie them up a bit.

In previous years I have made little ‘shopping bags’ and folded pouches but I thought it was time to try something different. This presentation is not 100% successful. It is a bit wobbly and needs to go into a flat bottom cello bag for transportation (as in to the recipient, not to a penal colony). Also I am not wild about the foil wrapping on the eggs. It is a bit busy for my tastes but that is how they come. The hard candy shell eggs would have been better visually, but obviously hygiene prohibits the use of unwrapped items. I don’t think anyone would like a mouthful of glitter along with their chocolate. Or indeed a little bit of Riley now that we are in moulting season!

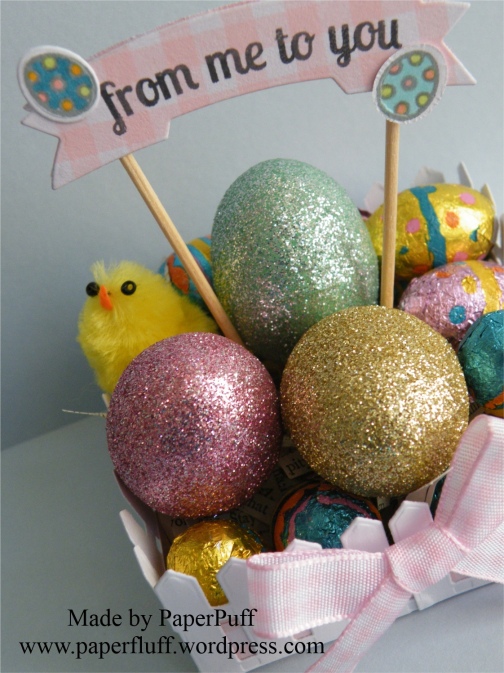
Still, the idea is ok, I think. I just made a quick box base from double sided gingham card and added a layer of with shredded paper. Shakespeare, in case the recipient should also fancy a jigsaw puzzle and some light reading. The outside is covered with multiple cuts of a picket fence die that was free with issue 144 of Papercraft Essentials magazine. Good free stuff!! Then I filled the box with some polystyrene eggs (from The Works) that had been covered in Martha Stewart glitter, one of my sadly deformed chicks and as many mini eggs as seemed feasible. Think of loading to the max a salad bowl, or a skip, whichever you can best identify with.

The final touch is a banner made with Clearly Besotted Mini Banners stamps and die. I cut the shape twice – once around the stamped image and once from plain gingham cardstock. I used red liner tape to fix an couple of cocktail sticks to the back of the stamped image and then 3D foam to cover the workings with the second die cut. A couple of Lawn Fawn Hoppy Easter eggs were hanging around so they got used too.

eggsbox1eggsbox3eggsbox2eggsbox4

Having stared at chocolate so much I am now off to eat some!


Mother’s Day Cards

Either late, or early depending on where you live!

These are the cards I made for Mother’s Day this year. I waited until after the day as my mother reads all my blog posts. She also still watches to make sure I cross the road safely, and yet this is something I have been accomplishing without incident for years…

For the first I used some Tonic dies I have had for a long time. They are very adaptable as you can cut the hearts out completely or leave them in the card. I decided to make a kind of layered window effect, so the top layer has the larger heart cut into it and the second layer has the smaller sentiment. It doesn’t show up too successfully in my pictures, I’m afraid! As I was going for an all cream card I thought I needed a bit more interested so rummaged through my embossing folder trough and selected one from Sizzix that has some pretty details but is not an all-over pattern. Sometimes a little bit of blank space is good. I tied the ribbon knot and thought I had finished, but then changed my mind and added the trail of pearls too.

mothers day heartmothers day heart 2mothers day floral muse

The second card is made with Dovecraft Floral Muse papers. I know I have used these a few times now, but they are my current ’go to’ when really pretty and feminine patterns are required. I was inspired by something I saw on Pinterest, but I changed it up a bit and added several details of my own. The various layers of papers were edged with Vintage Photo Distress Ink to give them some definition. Butterflies were fussy cut from one of the pages in the pad and then I spent ages trying to find a good match in my ink colours for the sentiment. Many a green was tried and tossed and finally I went with Brilliance Pearlescent Beige. A few more pearls again (well, why not?) and I was happy. Oh, and another doily from my doily mountain has been used….

Supplies: Dovecraft Floral Muse paper pad; Clearly Besotted Mini Banner stamp and die; Tonic On Mother’s Day Affections Insert die set; Sizzix embossing folder (it has no name on it!); string pearls from The Ribbon Room and individual pearls from Dreamees


April Showers

How to make something seemly simple take for EVER!

Now to look at this card, you might think it was the work of a few minutes. Stamp out the umbrellas, add a bit more stamping using the colours and the sentiment, grab a band of ribbon and Robert is your father’s brother. Hell, no.

april showers

For a start, the umbrella comes in separate bits. Don’t get me wrong, I am not complaining. It is a feature of the stamp set that I really like, because there is room to play. So, I started my repeat pattern with the central umbrella, to make sure it was where I would want it. Handle first, then the canopy outline.

So far, so good. Now, each canopy, either spotted or striped, comes in 3 pieces. Again, I was happy with this because I wanted to mix it up a little, both with colour and pattern. I wasn’t confident I could stamp exactly in the right place 20 times and not fudge up though, so I decided to stamp then on scrap card and cut them out individually. Nobody say anything, OK?

Cutting curves accurately is not in my skill set. I had to re-do a few, but, eventually, I had a full cast of canopies, spotty and stripy, at my disposal. Hurrah! Assembly time!

Casual abandon is not in my skill set. Whatever arrangement I came up with, something offended me visually. Two blues too close together, yellow stripes too far apart… I decided that maybe it was because I didn’t have enough sections. Perhaps there was a basic maths principle I should use, to work out my pattern requirements?

Maths is not in my skill set. Pretty much the only thing I remember about maths is the Fibonnaci sequence and how to quickly tell if a number is divisible by 3. How often do either of those come in handy?! Unless I am trying to make small talk with two Italians whilst splitting our restaurant bill, not so much. I gave up on the maths idea. Back to winging it.

Winging it is not in my skill set. Rational thinking occasionally shows its face though. I gave up on the idea of mixing the colours and patterns and went for uniformity. So, a card which could have been relatively quick ended up taking ages. Just peachy…

Supplies: Clearly Besotted April Showers stamp set; Brilliance Pearlescent inks in Rocket Red, Sky blue and Sunflower Yellow; Memento Tuxedo Black ink; ribbon from The Ribbon Room


The sun, and colouring

vintage-teacup-pair

Colouring has always given me problems. Both physically, as I am of partly Irish heritage so, basically almost see-through pale and red hair. Prone to ‘lobster’ within about five minutes of full-on British sunshine, which, let‘s face it, on a sunshine scale is still in the ‘could try harder’ range.

Also, craftily. I cannot colour. Helpful TV or YouTube demonstrators say things like ‘just decide where the sun would be, and therefore where the shadow is and you can’t go wrong’. Poppycock. I am aware of the sun (see aforementioned personal issues with the golden orb) and have managed to grasp the tricky concept of shadows since childhood (Peter Pan was a big help with the science bit).

But the demonstrators don’t tell you what to do after that!! Just because I know where the sun is, does NOT mean I know where ALL the shadow should be! And how do I make a shadow anyway? I try just adding a smidgen of a darker shade, or two, and attempting to blend it in a bit, but I still can see it is not good enough, not ‘right’. And when do you stop? When is it finished? How do you know? I have heard people say ‘it will be obvious when you are finished’. Never has been to me. Does that mean I should continue until the paper literally falls apart with the amount of alcohol marker I have slathered it with? Will it be done then?!

Is colouring an ability you either have – like perfect pitch – or you don’t? Was I not in the right queue at the gene pool? Was I still changing into my swimming costume? Or reading the warning notice and wondering what on earth ‘bombing’ was? Or eyeing up the lifeguard? Or did I just see a notice that said ‘do you want chocolate’ and got distracted? Then in the meantime all the colouring genes were handed out, the counter closed and I was left with ‘you will always find comfort in cocoa beans’ as my gift??

So, this first card graphically demonstrates another failed attempt at colouring. I thought I would be strategic and use pearl card, as I hoped the markers would glide and blend more easily. Sadly it still looks like someone did it with a cheap felt-tip pen that was gasping its last. Having spent some time stamping and embossing the cup, saucer and spotty decorative detail I felt demoralised. Even more so when the marker smudged some of the embossing a bit too. I didn’t think that was supposed to happen. I thought that was against the law. But hence all the circling around the embossed dots, rather than gliding over them seamlessly. And I honestly laid down SO MUCH colour, went over and over with the pens but still have ugly lines and blotches. Phooey.

vintage-teacup-blue

After that, I licked my wounds (and a couple of bite size Snickers left over from Christmas) and went back to using colour in a way that works for me. Paper piecing. Stamp it, cut it out, layer it up. Emboss a scattering of random hearts too. Some inner calm was restored, but not enough for me to be able to decide on pink gingham ribbon, or blue gingham ribbon? Therefore, like the witches in Sleeping Beauty, I ended up with both.

vintage-teacup-print

Supplies: Altenew Vintage Teacup stamps and Wam Grays ink cubes; Clearly Besotted Diagonal Stripe stamps; Crafter’s Companion Centura Pearl card; Papermania Blueberry Hill paper pad (old); Create and Craft gingham ribbon

An Elliethank. This is not a typo.

I had personal need of a thank you card this week, and wanted something unfussy but pretty. I dug out my Clearly Besotted elephant die and an old paper pad I though would do the trick.

Now normally I would use these dies with the matching stamps, but as I wanted to feature the patterned paper that was not on. I was happy enough that the dies alone give a recognisable elephant shape, but this meant he was missing his eye, a detail which the stamp would have yielded.

Seeing as I cannot draw ANYTHING, seriously my drawing skills are right up there with my neurosurgeon and trapeze artist ones, just the thought of adding as simple a detail as a nod to an eye, let alone an eyeball, lashes and twinkle made my blood run cold. It’s not just the eye itself, but the positioning. Supposing I end up with it half way down his cheek, or under where his ear will go? Then my cute Elliethank becomes a little more Elephant Man.

But I can’t let the little guy go eyeless, can I? How will he find his way about? Although, maybe bumping into stuff would not be his greatest trial. On reflection I don’t think I have done him any favours in the camouflage department…

Anyway, courage was summoned (wine helped) and after an infinity of hovering over him with a pen I just did it. Slightly off where it should be (I blame the wine, stupid idea) but bearable.

Today I put the card together with a subtle stamped sentiment, also from Clearly Besotted, and a nameless embossing folder. Actually now I wish I had gone for less embossed pattern, which was the original intention, but too late. I might make a second one though! The background is in fact the palest shade of pink, but winter light will not allow this to show.

elliethank

Hope everyone is having a lovely weekend!


Little boxes

Where did December go? Am I the only one that seems to have lost a week somewhere? I need to get a wriggle on!!

Just a quick post, an escape into Blogland before I go back to the ‘to do’ list. That list has magical qualities. No matter how much I cross off it never seems to get any shorter.

This Christmas card offering is from the Craftwork Cards Petite Glitzy Villages kit. I thought they would be quick and easy, but a little bit different and fun too. However, one should always do the research before purchasing! The sections with the houses on them are just printed squares, so if you want the diorama look, you have to cut around the houses and trees. I have mentioned before that I am NOT good at cutting out, and I don’t find it relaxing. So thin, fine detailed fir trees, plus a bit of time pressure meant I was starting to lose the will to live by panel number two. Reader, I fudged it. I cut around the house for the front panel (even I can manage a boxy shape) and applied severe (terminal) landscaping to the trees by chopping them off completely. Then I pulled out my trusty Clearly Besotted Tree Landscape die, cut it in gold and fixed them behind the house panel to replace those I had made into firewood.

The picture of the finished card on the kit also had a gold starry background, but you can only achieve this by sticking the panel with two houses to the very back, thus limiting your layers. Or else use this panel twice and reduce the amount of cards you can make with the kit. So I ended up making my own snowy background with the Avery Elle Falling Snow die I have used for many a card this year!

petite-glitzy-villages

So, a bit of a hybrid, and not quite as quick as I had hoped, but I like the overall effect. Also they fold flat to go into an envelope, which is a big plus.

Hope everyone is doing better with their Christmas preparations than I am!


Three degrees

deer-family-multi

Whilst rummaging in the craft room at the weekend I came across some snowy acetate I bought a couple of years ago. Nothing like rediscovering an old friend, is there? I decided to give it a bit of a workout. Also, those who read my posts regularly may remember that a vital Christmas die went missing a few weeks ago. The guilty party is either the cat or a poltergeist, because the die was returned last week. Left in the middle of the living room floor. Hmmm. I am pretty sure forensic testing would detect kitty DNA, or at least tuna… Anyway, it is back so Christmas is no longer cancelled.

To the cards, then. The first ‘degree’ of difficulty, is well, not in the least bit difficult really. I used the Deer Family die as it is, plus a banner greeting. A square of the snowy acetate was layered over royal blue card for the background sky, 3D foam and done. Total absolute beginner level. I think it would be good for a male Christmas card, maybe?

deer-family-simple

For the second degree, well there was a bit more thinking required for the composition, but once that was done it was simple to put together. Here I have used acetate to make the base card: it is sturdy enough to stand up with no problem. This time for the Deer Family I cut away the circular dome, so they are just silhouettes on a strip of card. I stamped and embossed the sentiment onto vellum and then wrapped the vellum around the layer with the Tree Landscape and adhered this to the piece with the deer. For acetate cards you need to tidy up the inside too, so nobody sees the gluey mess that is your shame. Just cover it up with another bit of card and nothing to see here! You also need somewhere to write. Well, unless you don’t like the recipient enough to bother, but then why are you sending the card?! My top tip for this (only thought of it today) is to flip the card over so the front is facing down on your work surface. Now you can easily layer a panel to line up with whatever is on the card front. Then you can turn the card the right way up, open it and align the interior panel perfectly with the one you have stuck to the very back of the card. Hurrah!

deer-family-acetate

Now, the third degree of difficulty. I could have done with a lie down in a darkened room after this. All the dies are from different companies, so not intended to be used together but I had in my head that a diorama style would be fun. Fun for who, exactly?? I jest. It was a good thing to try and I felt I had achieved something. I’m not going to explain how I did it, because part-way in I had a bit of an epiphany and may have come up with a better and easier method. I will test it out and share if it works.

deer-3d

I do have a question to throw out there though. I want a detail gold embossing powder that is a really rich, bright, warm gold. The one I used on the first card here is, to be fair, at least 12 years old, but it is too ‘muddy’. Also, it MUST be a detail powder. Anyone got any recommendations? Oh and acetate, nightmare to photograph. I think you can see the roof of the house across the road in one of these shots and our guttering in another….how picturesque!

Long list of supplies today:

Clearly Besotted Tree Landscape and Mini Basic Banners dies; Lawn Fawn Village Border die; Memory Box Deer Family Circle die; X-Cut Rectangle Parenthesis Large dies; The Ton Holiday Lyrics (Dashing Through the Snow); Clearly Besotted Mini Basic Banners III stamps; Hunkydory snowy acetate. Rest of supplies from stash.


3D Thursday: home for the holidays?

Week four of my 3D Thursdays. I wasn’t sure I would manage to keep it up, but I have stuck with it (sorry!) and am having fun making little glittery things. Well, today it is one very little, very glittery thing.

I have used a Tattered Lace Shop die (bought last year) to make a Christmassy something. It could be purely decorative, or another Advent calendar piece, or even an alternative Christmas card or tree decoration.

Firstly I printed out some music score from the Hearts and Roses Christmas digikit using Serif CraftArtist. With uncharacteristic foresight I actually thought about where to position the die, so I have musical notes in the right places, as opposed to featuring the gap between the staves. Hurrah!

Next to crease and glue the shop (hereafter known as the ‘house’) together. I inked the house corners in silver to define them a bit more. For the roof I wanted a different colour and texture so opted for some silver glitter cardstock, cut to size, the edges trimmed with decorative scissors and then stuck over the existing roof. Like double glazing. Ignore the fact the windows are open to the elements. This is a house for tiny yetis. I also used the same scissors to cut slivers of glitter card for the base.

holiday-house-1

The wreath is highly technical. It is made by twisting a silver pipe-cleaner around a pen to form the circle, dolloping on some tacky glue in a very heavy-handed way and then dunking in a tub of glitter a few times so it gets a bit clumpy looking, like wet snow. Mission accomplished!

holiday-house-4

The finishing touches are a string of sticky pearls to gussy up the gable end and a banner greeting raised up on a double layer of 3D pads. Add one twinkly battery tea light and ta-dah!

If you fancy having a go you don’t need a die to do this. There are plenty of free templates for houses available. You might even already have a cookbook with a gingerbread house you could use. If anyone does make one I’d love to see!

Supplies: Tattered Lace Essentials Shop die (retired); Clearly Besotted Mini Basic Banners stamps (Christmas selection) and die; Brilliance Starlite Silver pearlescent ink; pearls from The Ribbon Room


I hope they have good insurance…

The idea for this card came to me as I was falling asleep, which meant I had to get up and write it down as there is a strong likelihood I would have forgotten it completely by morning. Well, I would have been in that very irritating state of remembering I had a potentially good idea, but no clue as to what it may have been.

snowy-scene-detail

I wanted to make a little snowy scene, kind of like you would get inside a snow globe. There are lots of examples of this sort of card on Pinterest and many of them feature a Santa and Sleigh die of some kind, which I do not have. I pulled out the two dies I do have which might work for this and cut them out to see what I could do.

dies-for-snowy-scene

After a bit of faffing about (there is always some faffing about) I had a vague plan. I decided that my largest circle die could just fit over the trees on the Clearly Besotted Tree Landscape die (top one in the photo) so this would dictate the size of the scene. I cut the Avery Elle Falling Snow (not pictured) from black card, then positioned the circle over the bit I wanted and cut it out. I cut the Tree Landscape twice from white cardstock, giving me plenty of spare card to play with at the top and bottom of the image. Then I decided on the positioning, making sure I had two distinct layers for the ’hills’ and cut them out using the same circle die. I snipped one of the larger trees off the edge and stuck these two hilly layers onto the black circle with 3D foam. I added my spare tree back in the centre of the lower layer, also with 3D foam. I trimmed out just one of the houses from the Lawn Fawn Little Town border (bottom die in the photo) and stuck a bit of black card behind the windows so you couldn’t see the snow through them and then added a bit of Glossy Accents for more windowy realism!!! This house was then also added with 3D foam. Pretty location, nightmare for shopping and in peril of an avalanche. Insurance had better be up to date. The whole thing was then mounted onto a white circle of card to show up the snow and a banner greeting added.

I can’t decide. Ribbon or no ribbon?

snowy-scene-with-ribbonsnowy-scene-without-ribbon

Supplies:

Dies – Avery Elle Falling Snow; Clearly Besotted Tree Landscape and Mini Basic Banners; Lawn Fawn Little Town Border; Spellbinders circles

Stamp – Clearly Besotted Mini Basic Banners III